

Master Capacitor Measurement: Top 6 Methods (2026)
A capacitor is a fundamental circuit component. It is part of almost every circuit.
We use it for noise cancellation, frequency filtering, signal smoothing, and energy storage.
To work with capacitors we need to learn about capacitor measurements. Because capacitor values are essential for any circuit design or repair.
So how to measure the capacitance of a capacitor?
Well, this is what we will cover in this article.
At the end of this article, you should be able to:
- Measure the capacitance of any given capacitor
- Learn how to use a multimeter for capacitor measurements
- Learn how to use a component tester
- Learn how to use a capacitance meter
Sounds interesting? Well, I am sure you will also enjoy the rest of this article.
Let’s get started.
Capacitor measurements theory
As you know, a capacitor has two terminals, and we measure capacitors in terms of capacitance.
Capacitance (C) is the ability of a capacitor to store energy. The unit of capacitance is Farad.
Let’s see some fundamental mathematics of capacitance.
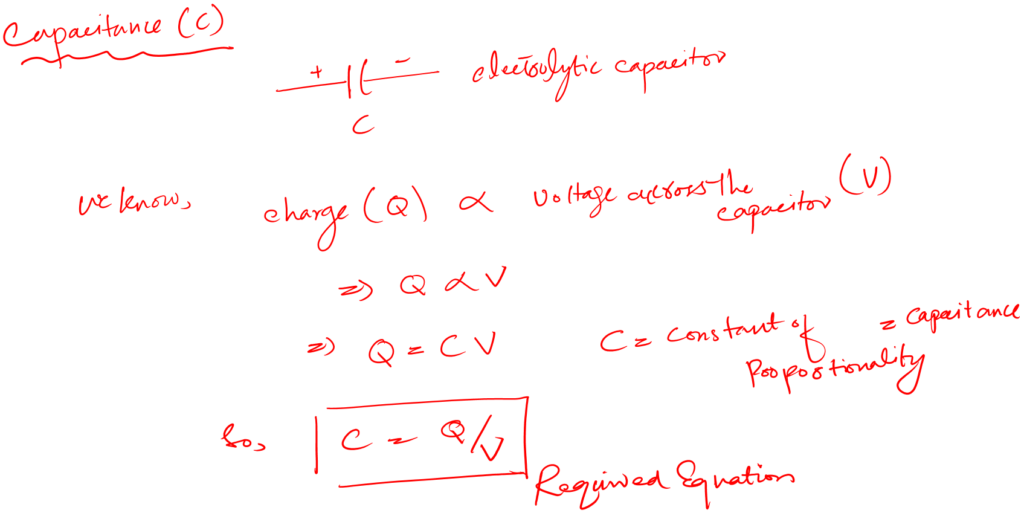
You can see that capacitance is the ratio of total charge and the voltage applied across the capacitor.
So, if we find these Q and V values we can actually calculate the capacitance value of the given capacitor.
This equation seems promising, but there is an alternative way as well. And that is by using the time constant equation.
Capacitor time constant
Well, the time constant is one of the amazing parameters of a capacitor that we can use to measure the capacitance of the capacitor.
What is the time constant?
Simply…
The time taken by a capacitor to charge up to 63.2% of the given voltage source is called the capacitor time constant.
Let’s see the mathematics behind it so that you can clearly understand what I am saying here.
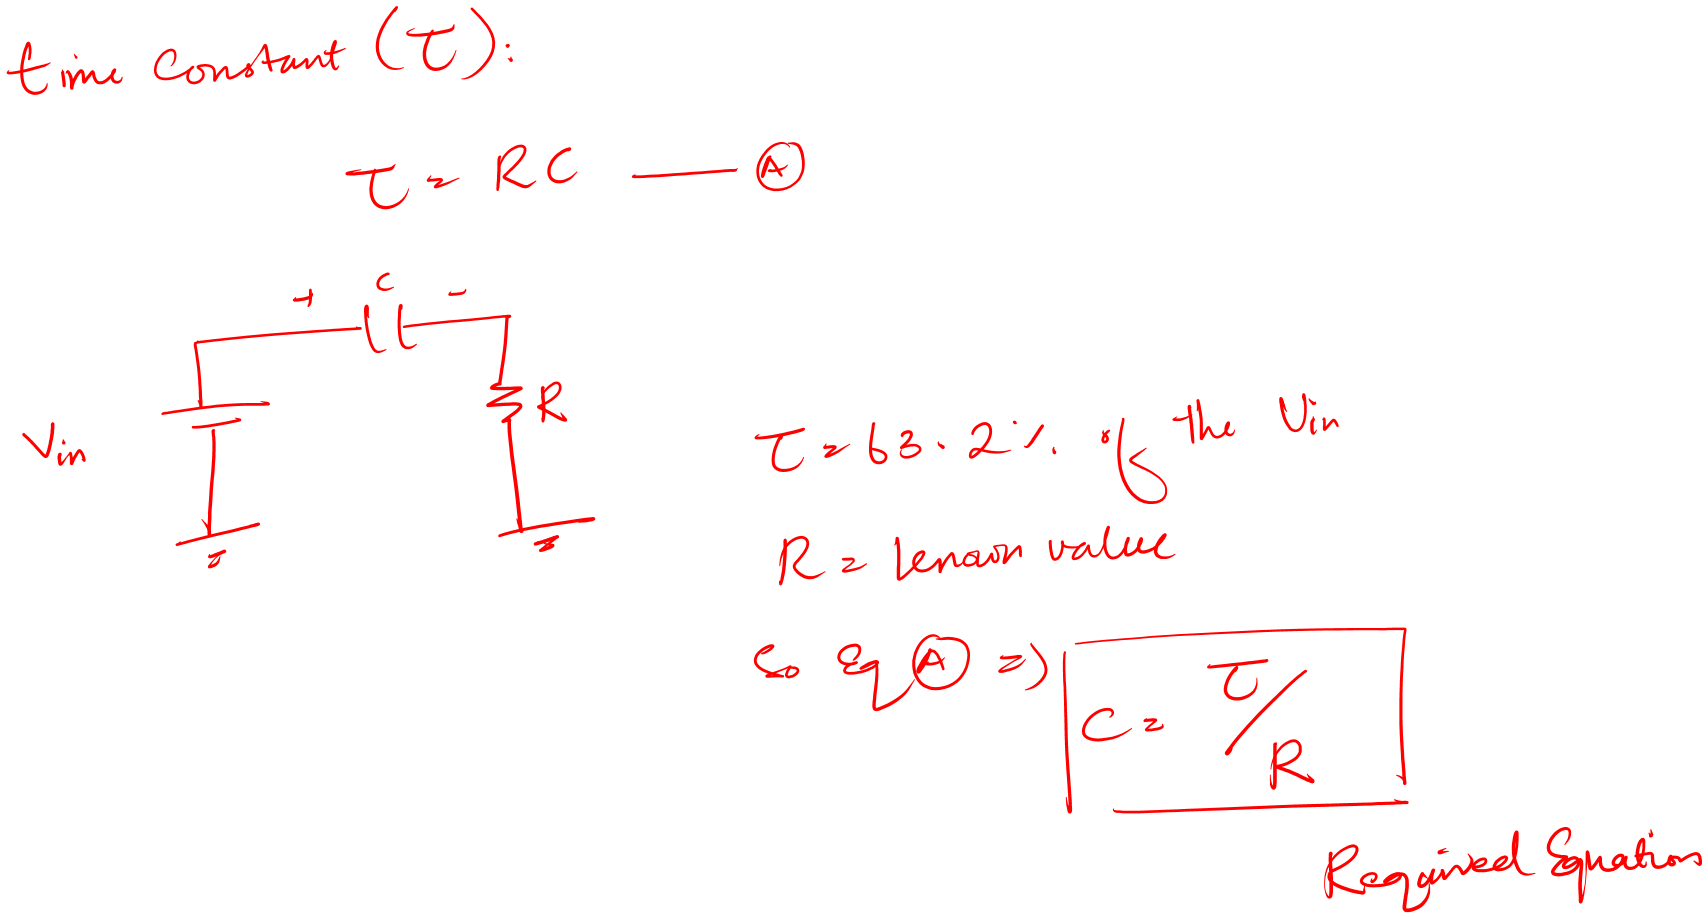
You can see that if we measure the time constant value. It would be simple to find the capacitance value using the given equation.
Alright!
The purpose of my sharing this general theory of capacitor measurements is to give you a vision of how can we use different mathematical equations to design various tools.
Also, to give you an idea of the behind working of any measuring device designed for capacitance measurement.
Let’s get into the practical method of capacitance measurements.
Capacitor measurements methods
You may encounter two cases in which you may measure the capacitor.
- The first case would be a solo capacitor.
- The second case would be when the capacitor is connected to the circuit board
No matter what is the situation the first step is to discharge the capacitor fully.
Discharge a capacitor fully
A capacitor is a charge storing device. Meaning that it can have stored charges even if it is not connected to the circuit.
So, it is very important to play safe with this component. Else it can give you an electric shock and can fully damage your measuring device.
After understanding the above threat of a highly charged capacitor we must know how to discharge a capacitor before working with it.
How to discharge a capacitor?
Well, there are a couple of ways in which you can discharge a capacitor.
For example:
- Using a screwdriver
- Using a discharge resistor
- Using a high resistance pliers
a. Using a screwdriver
Follow the below easy steps for discharging a capacitor using a high resistance screwdriver like these (Amazon link):
- Take an insulated screwdriver (with a longer handle) and hold it in one hand.
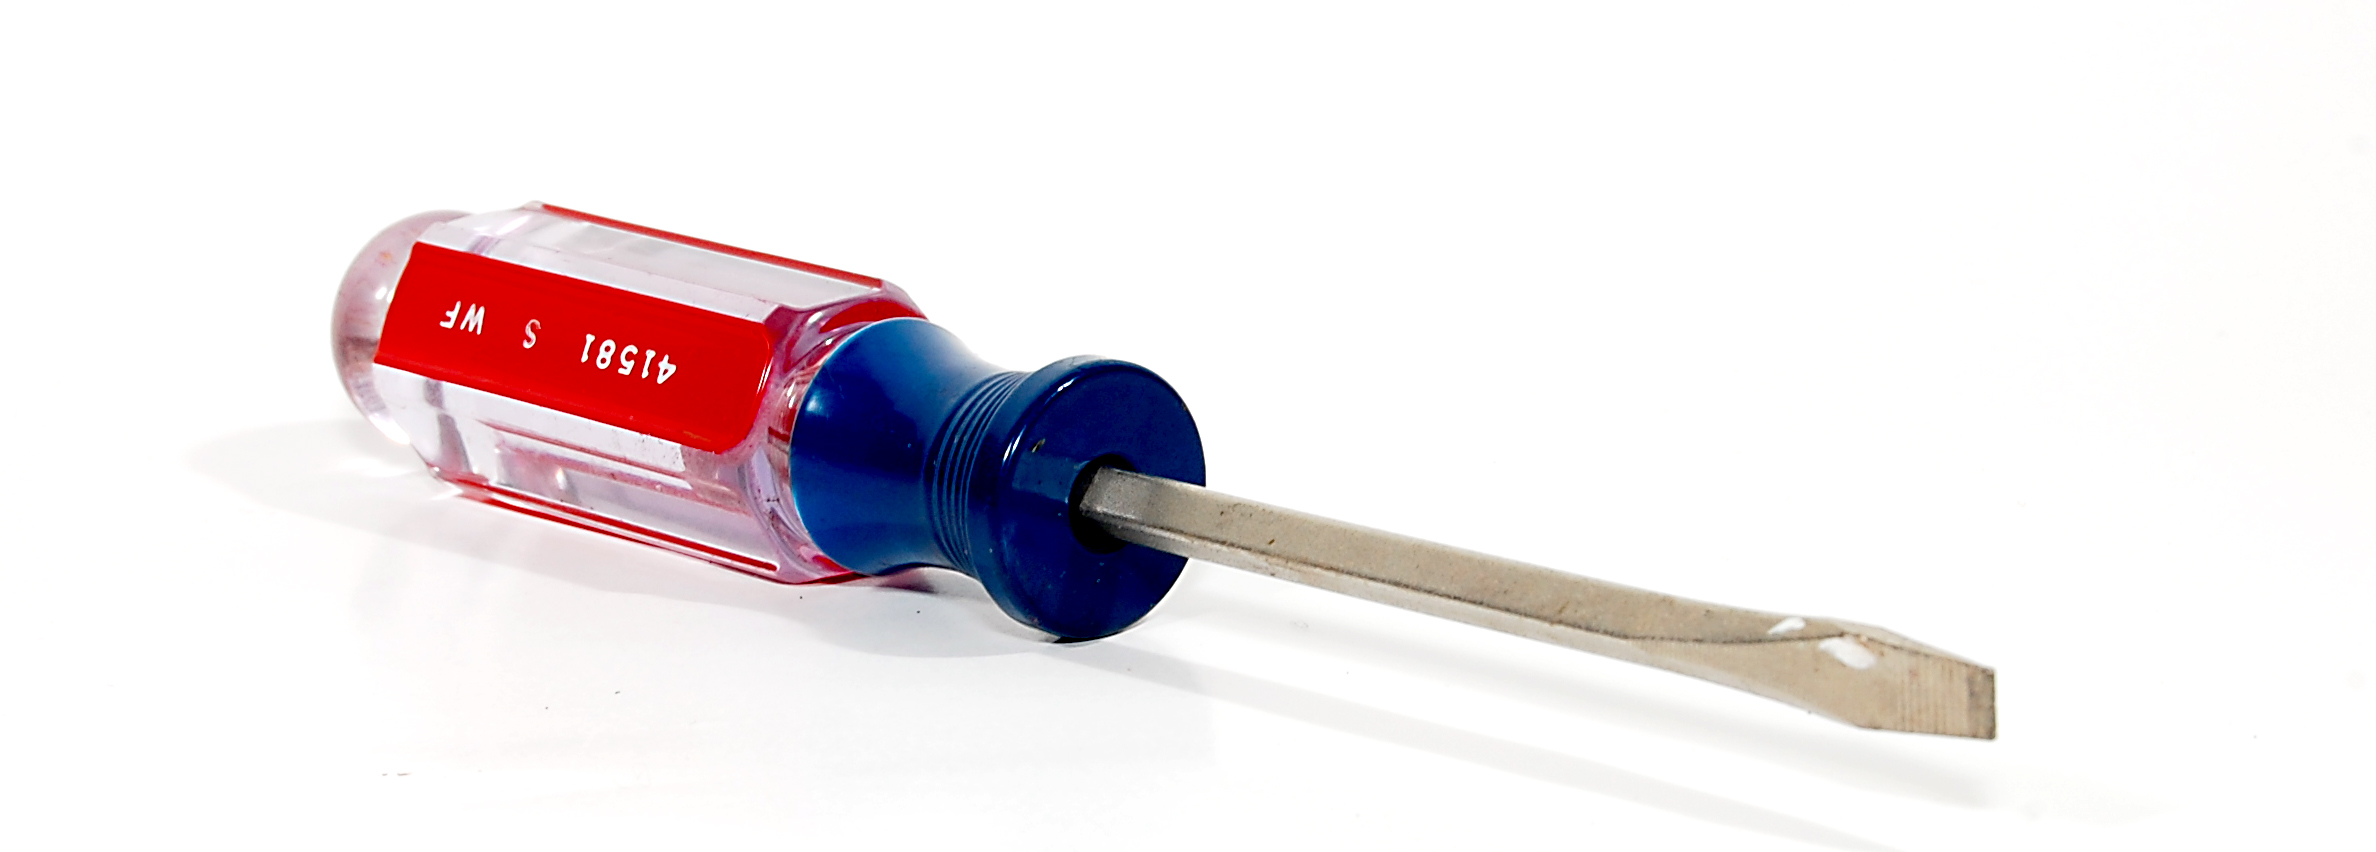
- Take the capacitor in the other hand (it is better is place it on the table if the capacitor is big) and touch the metal part of the screwdriver to both the terminals of the capacitor.
- You will see sparks and hear some crackling sound as an indication of electric discharge.
- Repeat a couple of times to make sure that the capacitor is completely discharged.
b. Using a high resistance pliers
Follow the below easy steps for discharging a capacitor using a long nose plier (a simple tool):
- Repeat the same step as we did for the screwdriver. But this time use a long nose plier instead of a screwdriver.
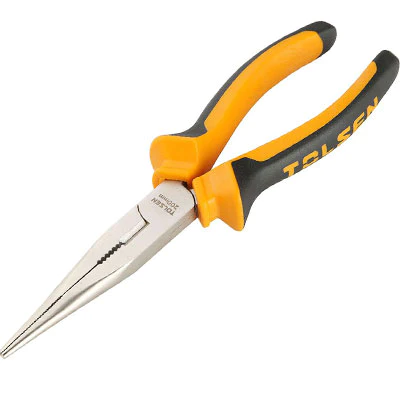
- Pliers are more effective than screwdrivers, in my opinion.
- Short the two terminals of the capacitor between the jaws of your plier.
c. Using a discharge resistor
Follow the below easy steps for discharging a capacitor using a resistor:
- Take a large value resistor (usually, a few kilo Ohms) with a high power rating (like 5W) and connect it across the terminals of the capacitor.
- Instead of directly connecting, you can make use of wires with crocodile clips on both ends.
- The capacitor will slowly discharge, and you can monitor the voltage across the terminals of the capacitor with a multimeter.
Alright!
After making sure that you have fully discharged the capacitor. It is the time to measure its capacitance value.
1. Visual method
Let’s start with our first method, the visual method.
This method is the easiest and most effective way to measure the capacitance value of any given capacitor.
Follow the below easy steps for an electrolytic capacitor:
- Take your electrolytic capacitor
- Discharge it fully before touching it
- On the body, you will find the written capacitance value for rated maximum voltage and tolerance.
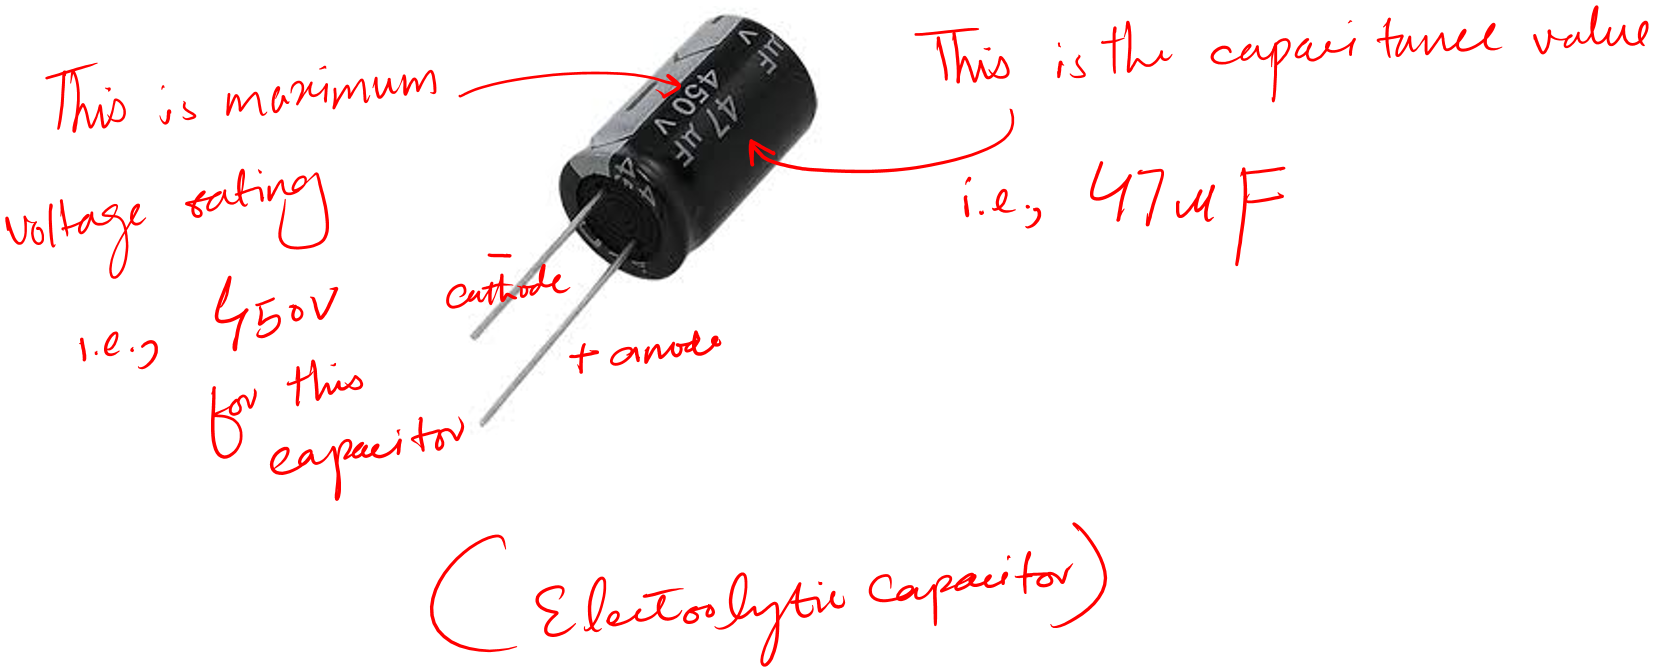
- It is that simple.
Follow the below easy steps for a ceramic capacitor:
- Take your ceramic capacitor and note down its written code
- The first two digits (starting from the left) of the code are the capacitance value
- The rest are 10 multipliers
- As ceramic capacitors are small caps they are measured in pF, nF, uF.
- For example:
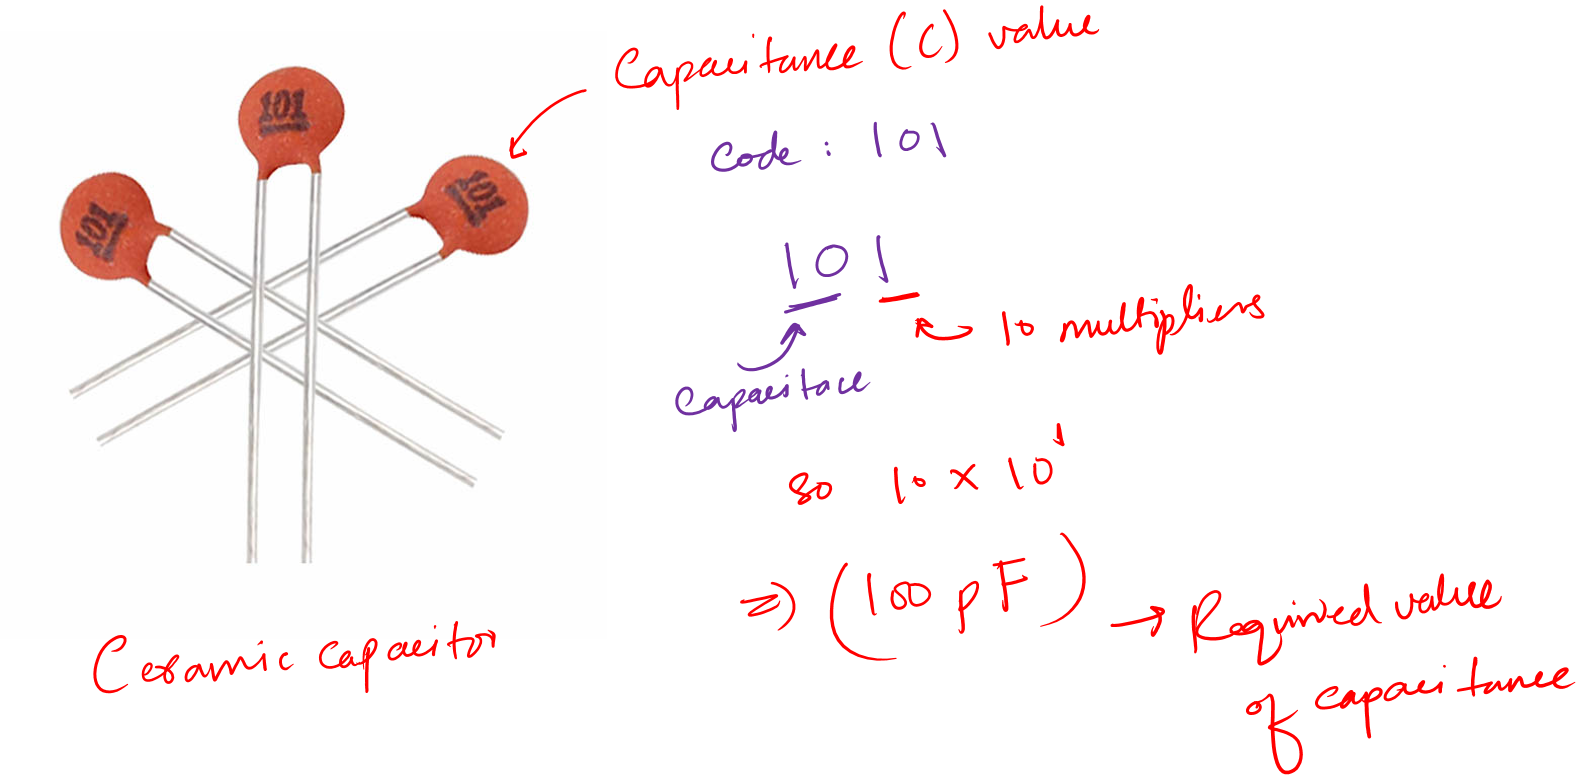
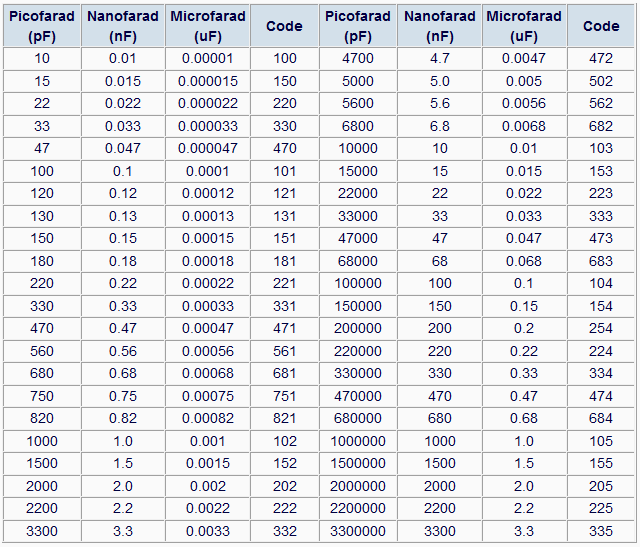
Following is the ceramic capacitor code and its equivalent capacitance chart for your reference.
Alright!
The above method is a widely used method for measuring capacitance value without using any multimeter.
You can tell that it is very straightforward.
With this method, one can say that we actually don’t need any meter to measure the capacitance value. Because it is just written there.
And you are right.
But if you think deeply. You will come to the conclusion that this method is limited to new capacitors only. Or to those capacitors that we are already confident about.
What about the old capacitors? Or those whose value is not readable.
Remember with time capacitors degraded and their capacitance value slightly changes.
To measure the exact value at the moment, we kinds require other methods to do so.
Also for testing the capacitor we do need some kind of meter that measure the capacitance value correctly.
I hope you got my point.
Alright!
Let’s talk about other methods that include meters to measure us the exact capacitor value so that we can test the capacitor correctly
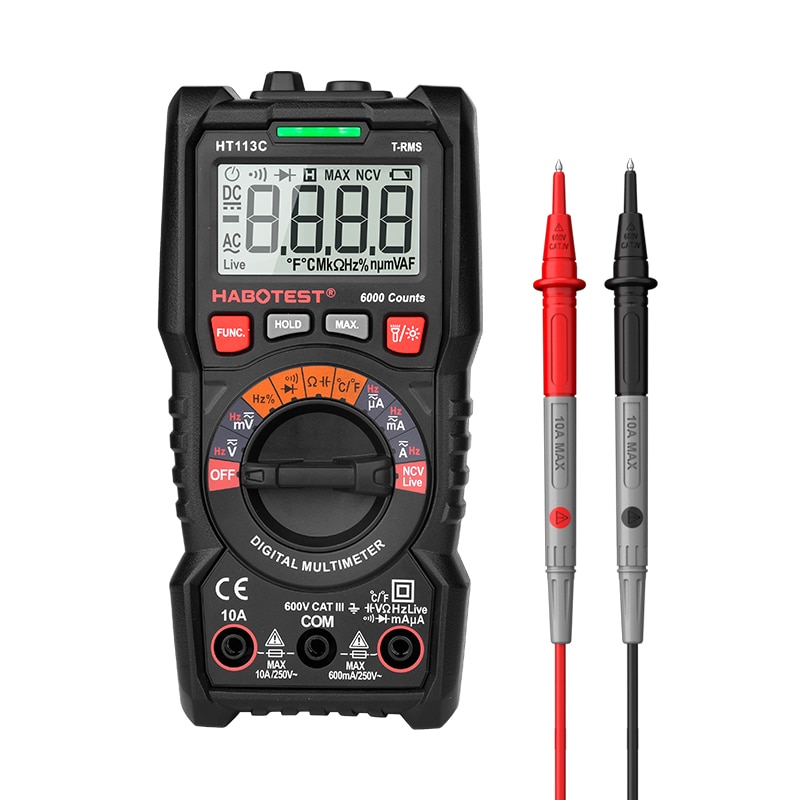
2. Using a multimeter
A multimeter is a device we use for the measurements of the following various quantities. Not just that we also use a multimeter for various circuit troubleshooting purposes as well.
- Capacitance measurements
- Inductance measurements
- Voltage and current measurement
- Resistance measurements
- Diode test
- Continuity test
- Transistor beta measurements, and pin configuration identifier
- Frequency measurements
- Temperature measurements
The cost of a multimeter increases with these additional measurements. But if you want them as per project requirements you can definitely have them in your single multimeter.
Alright!
Following are the steps using which we can measure the capacitance of the capacitor using a digital multimeter.
- First, take your capacitor and discharge it
- Take your multimeter and set it on the capacitance feature or mode
- For electrolytic capacitors, connect the black probe (-) to the negative terminal of the capacitor and the red probe (+) to the anode of the capacitor
- For ceramic just connect the probes the way you like
- See the results on the display.
- The values may start from low and gradually increase. Take the highest value.
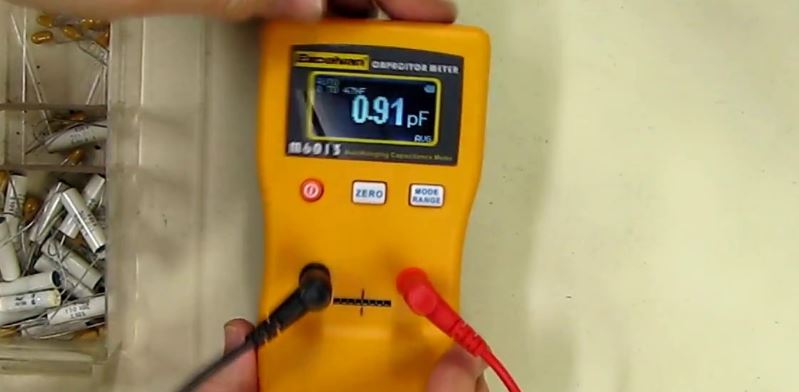
3. Using a capacitance meter
I think we all know by this time that a capacitance meter is a tool by which you measure the capacitance of a given capacitor. It is a specifically designed tool for measuring capacitance only.
You can use it to repair your old electronic devices, or just have fun measuring the capacitance of various capacitors. If you are an instructor, you can use it to conduct various lab activities, that students gonna love and appreciate.
Usually, in circuit components, capacitors are the most frequent components that fail to work with time, and you have to replace them.
To know whether the capacitor needs replacement or not you have to test it. And this testing is done by measuring its capacitance and seeing if its value drifted from its written value or not.
If the drifted value is in the given tolerance range, a capacitor is considered good, else it is a bad one and needs to be replaced.
Follow the following steps to measure the capacitance with a capacitance meter.
- Connect the probes to the meter.
- Black probe into the black socket and red in the red socket.
- You see the probe wires are too short, but this is to minimize wire capacitance and resistances.
- Now, take the capacitor you want to measure.
- Don’t forget to discharge the capacitor first.
- You can discharge the capacitor
- Put the capacitor in between the probes according to its polarity.
- If your capacitor is non-electrolytic then don’t worry about the polarities at all. Just place it between the probes and note down the reading on the digital screen.
Remember, when measuring capacitance it is required to bring the meter to zero value. This is done by pressing the zero button on the meter.
A lot of people make a big mistake there, they just press the button and forget to short the leads. So, keep in mind to always short the leads and then press the zero button to actually bring the meter to zero value.
4. Using an ESR meter
Another good parameter in capacitor measurements is to look for ESR value. ESR stands for equivalent series resistance.
ESR value helps us to test a capacitor on the circuit board directly.
What happens to a bad capacitor is that its ESR value changes. The change in ESR is totally helpful when determining with 100% sure if the capacitor is bad or good.
So you can now see that ESR value is more about testing the capacitor rather than measuring its capacitance value.
How do we measure the ESR value?
The answer is simple.
To measure ESR value you need to have a decent ESR meter. There are many options available on the market. You can search for that.
The ESR meter which I will use for this method is called the MESR 100 V2 (Amazon link). You can take any meter of your choice, the steps of this method will be applicable to them as well.
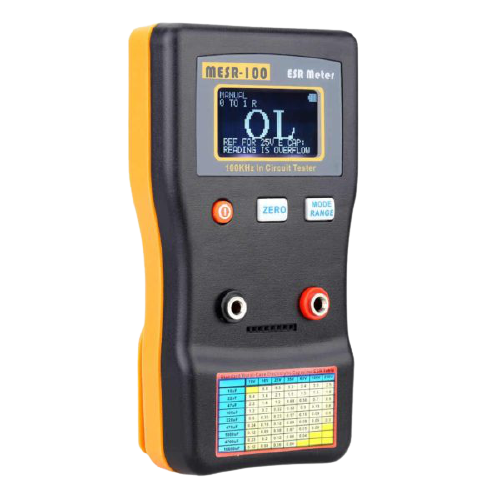
Follow the following step to check if the capacitor is bad or good.
- Take the MESR-100 V2 and turn it on.
- Connect the probes
- Short the probes
- And press the zero button – so that you have no pre stored value, and you start from zero
- Take your capacitor and discharge it properly through resistance material.
- Discharging a capacitor can be done by shorting the legs of the capacitor with any high resistance substance available to you.
- Connect the discharged capacitor to the ESR meter.
- MESR 100 V2 is an auto range device. It will automatically set the suitable range.
- See the results on the display.
After you take the reading. Compare it to the given ESR table on the body of MESR-100. If the results match, you have a good capacitor else your capacitor is a bad one.
5. Using a component tester
I believe you will like this method more than the above ones. Why? Because it is very simple.
A component tester is a device like a multimeter or capacitance meter. But it is geared toward testing and measurement both.
While a multimeter just does the measurement and leaves the capacitor testing to the person’s knowledge and experience.
A component tester solves this problem. And tell you directly if the component is bad or good. Leaving the guesswork.
Following is the m328 (product link) component tester.
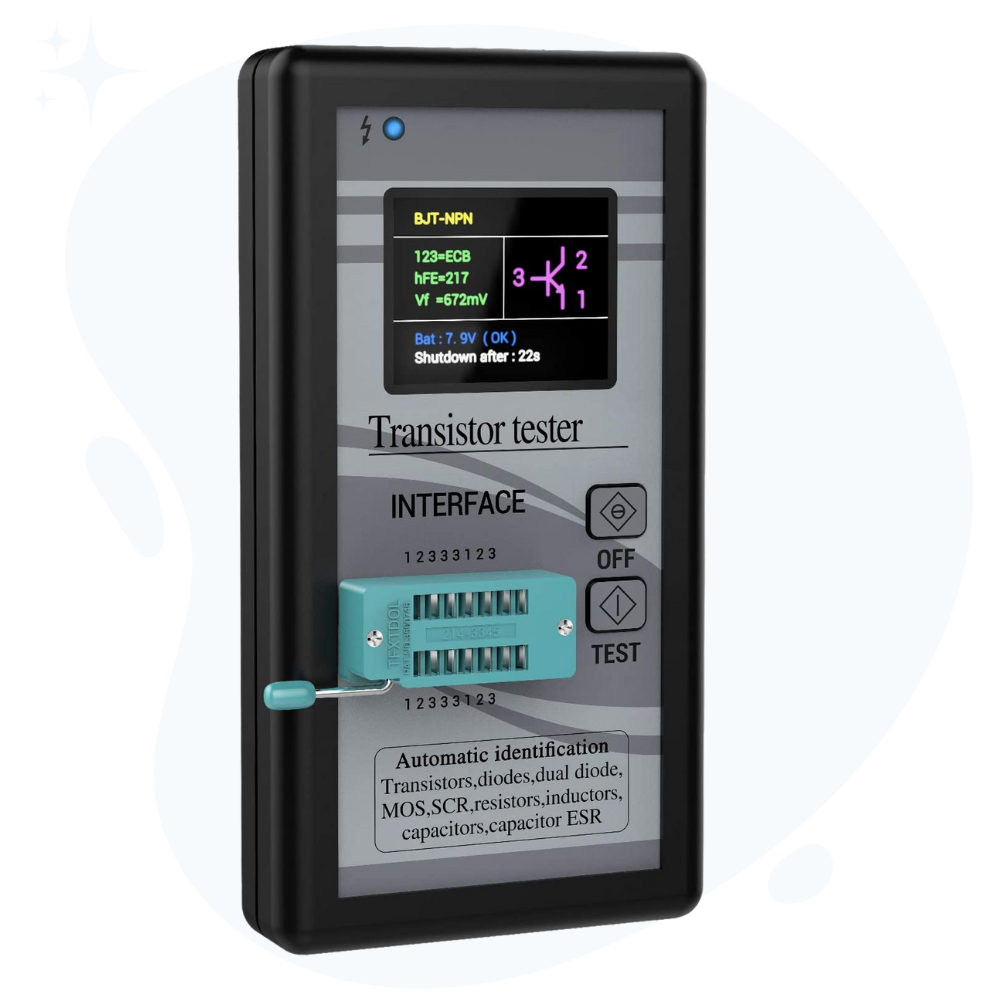
To use this mentioned tester for capacitor testing, follow the following steps.
- Take your capacitor and the m328 tester
- Turn on the tester and put the capacitor in the socket
- Remember to discharge the capacitor first, else it may damage the component tester
- This is so important and crucial, if you accidentally forget this step (discharging your capacitor), you may end up destroying your meter. For extra knowledge, always discharge a capacitor before measuring any parameter of it.
- Discharging of a capacitor can be done by shorting its legs by any available means. But don’t just short the legs together with low resistance wire, a good practice is to use a high resistance material.
- Press test button
- See the capacitance and ESR value if the capacitor is fine
- Else the tester will show a message on the screen saying that the capacitor is bad
It is that simple.
6. Using an oscilloscope
Yes, you can measure the capacitance value using an oscilloscope as well. Consider this method a hobbyist’s method.
An oscilloscope is a device that we use to measure or analyze changes in any electrical signal, and to study the behavior of a system, within its bandwidth limits.
It displays an electrical signal with respect to time, so you can see every detail of the signal i.e., its shape, frequency, amplitude, and distortion.
Alright!
You know, if you are reading this blog. This means you want to have knowledge about electronics.
Right?
Well…
The only practical way to measure capacitance without a multimeter or capacitance meter is by noting the written value on the capacitor body. Which we covered in the above section.
The rest of the methods is my try to share the knowledge that without a capacitance meter what are the other possible solutions?
And using an oscilloscope is of those many options for measuring the capacitance of a capacitor.
The question is how?
Well, the time constant is one of the amazing parameters of a capacitor that we can use for this method.
The time taken by a capacitor to charge up to 63.2% of the given voltage source is called the capacitor time constant.
Let’s see the mathematics behind it so that you can clearly understand what I am saying here.
For this method, you would need an oscilloscope to measure the time constant.
- First discharge your capacitor properly
- Then connect the capacitor in series with a 10K resistor
- Connect this series circuit (RC) with a voltage source
- Connect the oscilloscope to the capacitor and note down the charge time when the capacitor charges up to 63.2% of the connected power supply
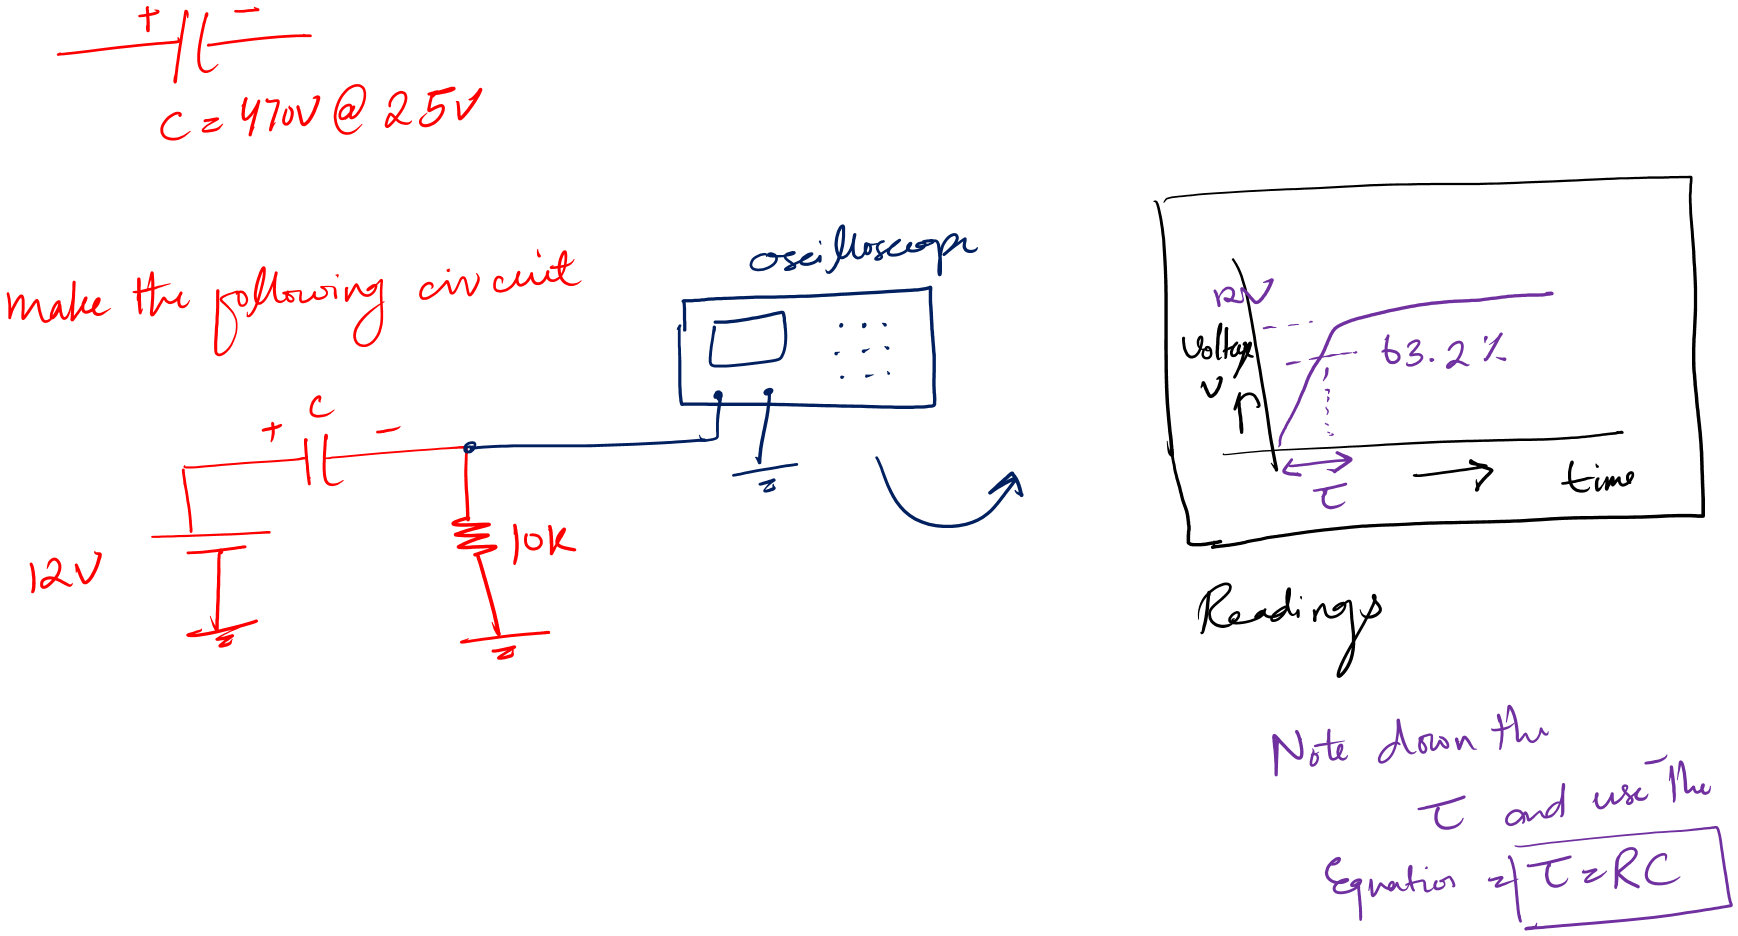
- After that using the above equation we measure the capacitance
- This is how you measure capacitance using an oscilloscope
- After this, you can also do the following
- Compare this capacitance value to the one given on the capacitor body
- If they match you have a good capacitor
- Else your capacitor is the bad one
I know this method is not that straightforward. But this is the option that you can use if you run into such a situation. Also, it is useful to help you gain more insights about the capacitor.
Conclusion
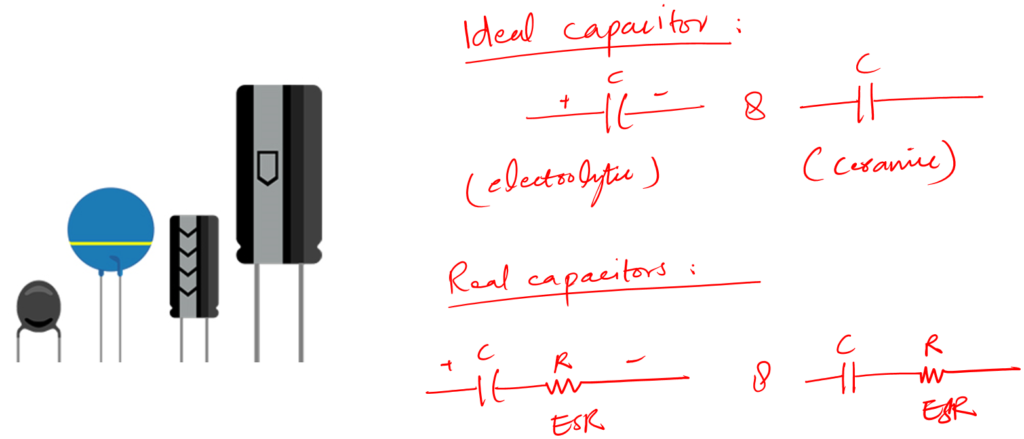
Capacitors are two terminal passive components that we use for various roles in our circuits. Such as filtering, noise cancellation, and energy storage.
One terminal is the positive anode (+) and the other terminal is the negative cathode (+).
Besides the terminal capacitor has two major types:
- Electrolytic capacitors
- Ceramic capacitors
Electrolytic capacitors are polarity dependent. Meaning that the anode has to be connected to the positive terminal of the voltage source. Similarly, the cathode needs to be connected to the negative of the given voltage source.
Ceramic capacitors have no polarity. You can connect them in the circuit the way you like.
Now capacitors are measured in terms of capacitance (C). The unit of capacitance is Farad (F).
There are a few ways that you can measure the capacitance of any given capacitor.
- From the written value on the capacitor body
- Using a digital multimeter or capacitance meter
- By using an oscilloscope or ESR values
- By using a smart component tester
For all the methods, the first rule is to please discharge your capacitor fully. Else you may harm yourself or can completely damage your testing device.
So that is it. That is all I have for you about capacitor measurements. I hope you enjoyed my limited knowledge effort.
Thank you and have a grateful life.
Other useful posts:
- Capacitor anode cathode identification (2 Easy ways)
- #10 Capacitor functions in circuits (Some best uses)
- What is a capacitor in electronics (Easy beginner guide)
- Electronic capacitor testing (5 Easy testing methods)
- Test Capacitor Without Desoldering [In-circuit Testing]
- How to measure capacitance without a multimeter (Guide)
Thanks a lot.I want to buy e-book pdf on electronics and electrical. If you help me I would grateful you.
Saleh Ahmed
Chittagong, Bangladesh
Welcome 🙂