

Capacitor Testing: Know if it’s good or bad (2026)
If you are working off the circuit (solo one) or in the circuit capacitor, it is very important to tell whether the capacitor is bad or good. A bad capacitor can lead to bad circuit performance and bad results.
The question is. How to test a capacitor effectively before placing it in our circuit projects.
Start by visually inspecting the capacitor for physical damage, such as bulging, leaking, or discoloration. Then, it will be tested for functionality using a multimeter by measuring capacitance. A component tester provides detailed parameters such as capacitance. An ESR meter helps identify faults without desoldering for in-circuit capacitors, focusing on low ESR for performance verification.
This article will discuss different methods to test capacitor functionality to identify bad and good capacitors.
Capacitor testing theory
You know, a capacitor is a two-terminal circuit component. It plays an essential role in circuits by eliminating noise, acting as a filter, smoothing the voltage signal, and storing electrical energy.
Following is a circuit symbol and a few physical capacitors:
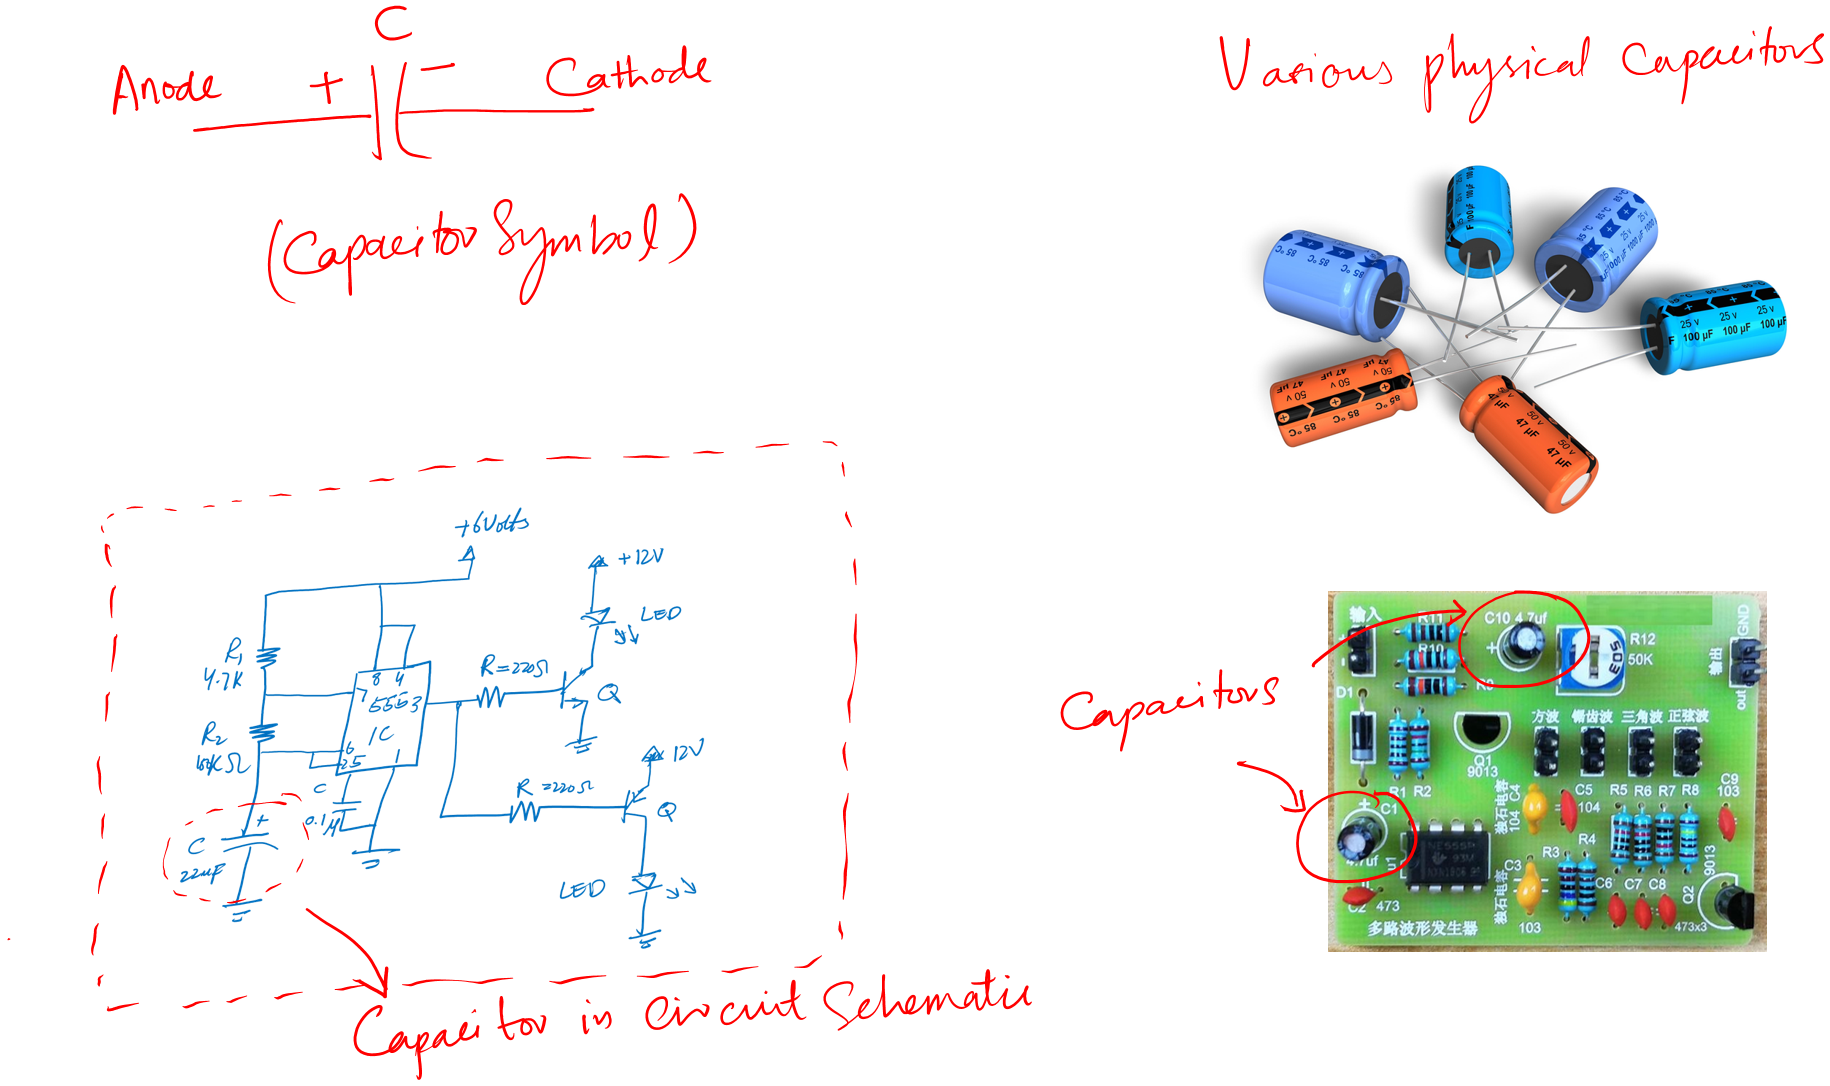
We have two types of capacitors: one is polar and the other is nonpolar. The circuit symbol shows that one terminal is the positive anode and the other is the negative cathode.
The anode and cathode make the capacitor polar type. The one which has no anode and cathode is the ceramic type (nonpolar).
Both types serve the same functions. However, the polar type (electrolytic capacitor) is mostly used for high-voltage areas.
The thing we are interested in is capacitance. We will use this capacitance to determine if we have a bad or good capacitor.
Capacitance
Capacitance (C) is the ability of a capacitor to store charge energy. The unit of capacitance is Farad (F).
This capacitance value is of great use. This shows that the higher the capacitance value the higher the capability of the capacitor to store more energy.
Let’s see some easy mathematics of capacitance.
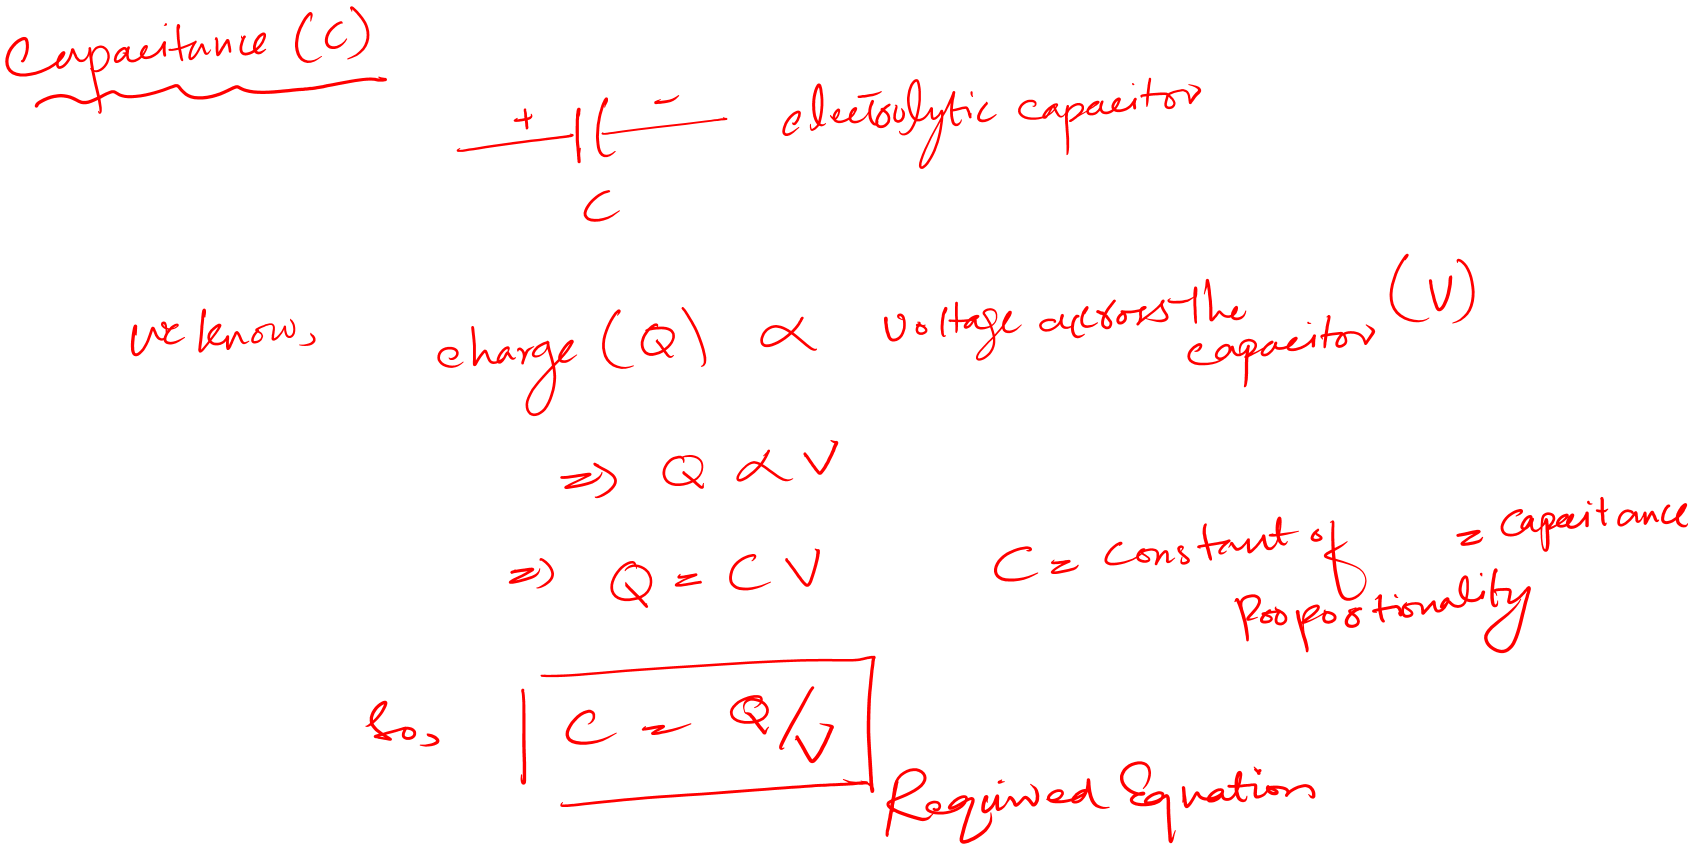
Now, the interesting part is that every capacitor has a manufacturer-provided capacitance value. We can read this capacitance value on the body of any given capacitor.
A bad capacitor has this capacitance value changed.
We measure this capacitance value using any capacitance meter and compare it with the given manufacturer value. And see if they match or do not match.
ESR value
The fundamental flaw with the above method is that we can’t measure the capacitance value when the capacitor is inside the circuit board.
Why?
In the circuit board, a capacitor is connected to other circuit components. And because of this, the capacitance meter gives us the equivalent measurement rather than the exact measurement.
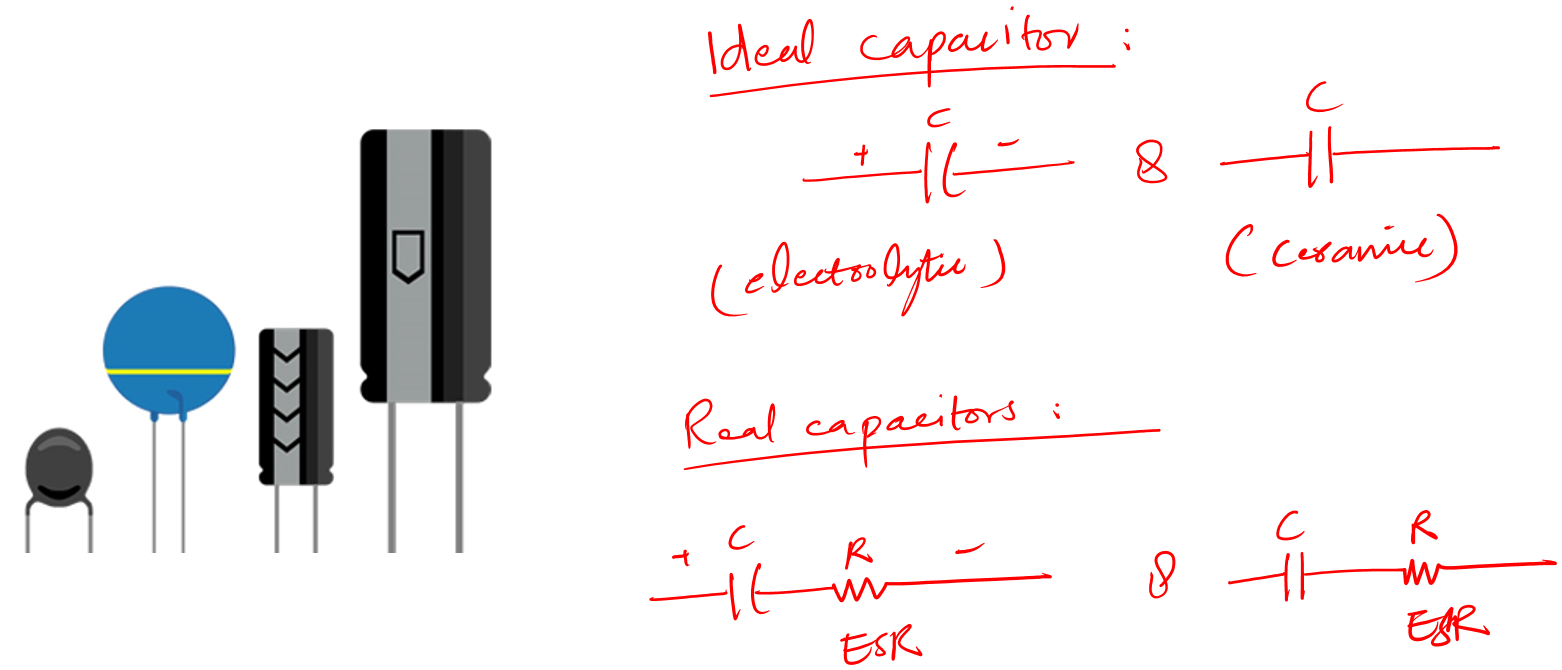
So in such a situation, we work with another capacitor parameter called the capacitor ESR value.
ESR is short for equivalent series resistance.
This value is typically small. We measure this value in Ohm as it is a resistance.
The interesting part of ESR value is: that it can be measured correctly even if the capacitor is inside the circuit board.
Good capacitor
Now that we have made some testing foundations. I believe it is time to correctly apply the above knowledge to identify a good or bad capacitor.
Identifying a bad or good capacitor (capacitor testing) is easy, but you need to be very careful when working with high-voltage capacitors. As they can have very high energy stored in them.
And if you don’t take proper care that high stored energy can harm you and can damage your testing device.
So, before any capacitor testing. The first thing is to discharge the capacitor.
Ok!
There are two cases for telling whether the capacitor is good or bad.
- Solo good capacitor
- In-circuit good capacitor
A solo good capacitor:
- If we measure the capacitance value. It should match the value given on the capacitor body.
- By matching I mean it should be in the tolerance range
- Like if a capacitor has a written value of let’s say 100 + 10% tolerance.
- Then a good capacitor capacitance value must be in the range of 90 to 110.
In circuit good capacitor:
- For this, we will measure the ESR value
- After having the ESR value we will match that ESR value to an ESR table.
- If the value matches the one given in the ESR meter – your capacitor is good
- You can carry this method with a capacitance value as well. But for this, you need to first desolder the capacitor from the board. Measure its capacitance value. If it is good resold it back.
Bad capacitor
To save you time, it is just the opposite of a good capacitor.
So how to tell if a capacitor is bad?
Again we will look at two possible cases:
- In circuit testing
- Off-circuit or solo capacitor testing
In circuit bad capacitor:
- Take the suspected capacitor off the board. I mean desolder it.
- Measure its capacitance value.
- If the value deviates by 20% change. You have a bad capacitor.
- For you have a capacitor of let’s say 100 + 10%.
- A bad capacitor would have a value beyond the 70–130 range.
Or ..
- Don’t desolder the capacitor
- Measure its ESR value by using an ESR meter
- Compare it to the ESR table
- See if the value matches
- If not then you have a bad capacitor that needs to be replaced right away
Off circuit or solo capacitor testing:
- I have already explained it above. Like measure, its capacitance value
- See if the value deviates by at least 20%
- If it does then you have a bad capacitor
Capacitor time constant (T)
The methods are practical and more effective.
But we can try other capacitor parameters as well to determine the good or bad capacitors. Such a parameter is the time constant (T).
The time taken by a capacitor to charge up to 63.2% of the given voltage source is called the capacitor time constant.
Let’s see the mathematics behind it so that you can clearly understand what I am saying here.
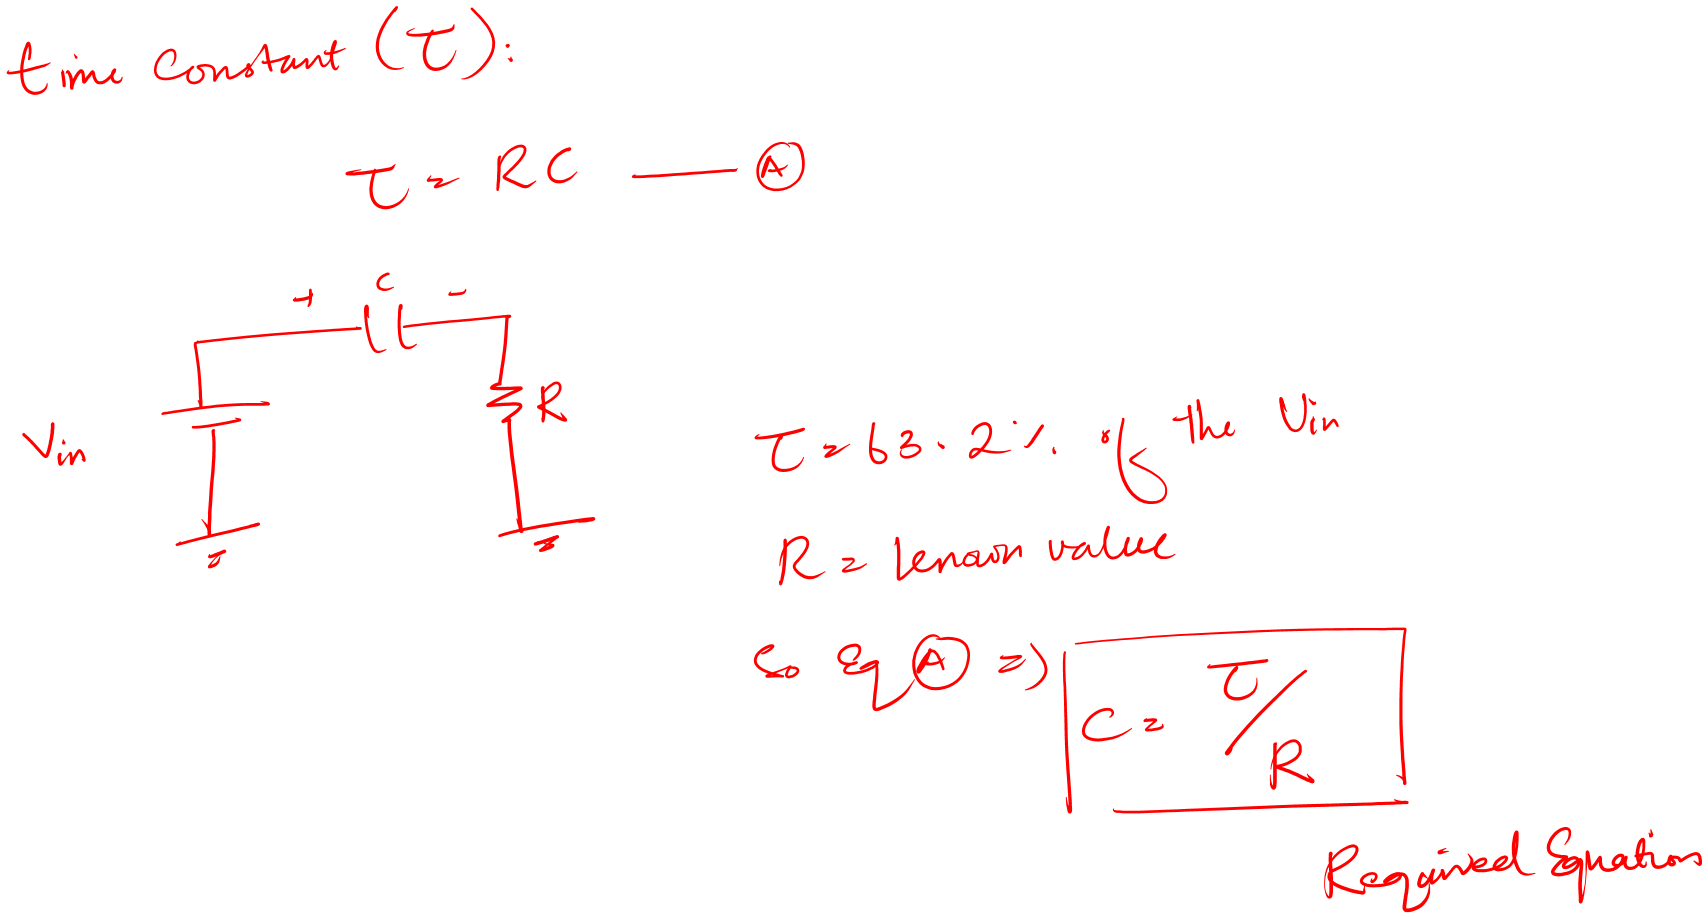
For this method, you would need an oscilloscope to measure the time constant.
- After that using the above equation and measure the capacitance
- Compare this capacitance value to the one given on the capacitor body
- If they match you have a good capacitor
- Else your capacitor is the bad one
Electronic capacitor testing methods
If you understand the above theory. Then you can think of a lot of ways to test a capacitor. I encourage you to put your creativity to the test and think of new ways.
You can share that in the comment section below. And I will be there to tell if it is actually practical or not.
Anyway.
The problem with capacitors is – they degrade as time passes. You have to replace them.
Sometimes it is really hard to tell if a capacitor is bad or good. Because sometimes even a good looking capacitor is actually a bad capacitor.
So, to make sure we have good capacitors. Following are the easy methods that you can use to tell if you have a bad or good capacitor.
Method 1: Visual inspection
The first method is visual inspection. This is the easy and most effective way to check for bad capacitors.
In this method, we look at the under-test capacitor and try to see the following signs:
- Is the body of the capacitor is busted
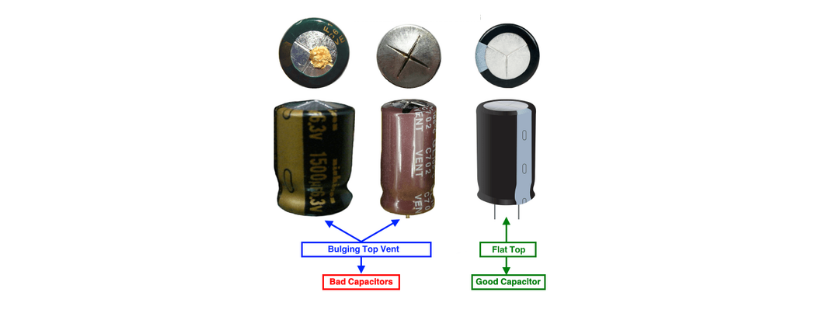
- Is the top side is popped up
- Is there any leakage on the body
- Is there any bump anywhere on the body of the capacitor
If you see any of the above signs, your capacitor is definitely a bad one, and you must replace it right away.
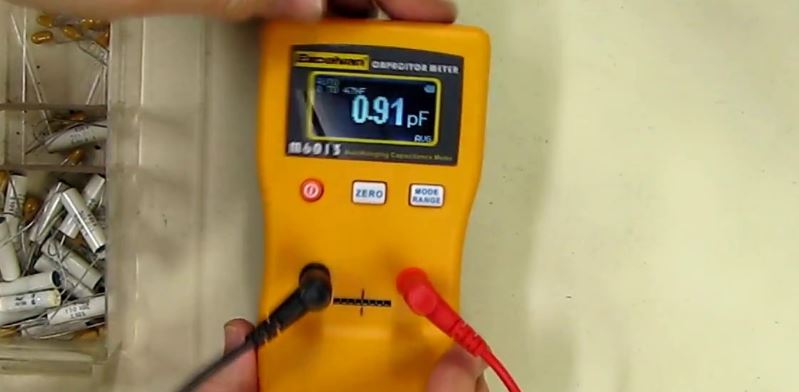
Method 2: By using a capacitance meter
A capacitance meter is an electronic device that measures the value of capacitance for any given capacitor (both electrolytic and ceramic).
Most multimeters also have a capacitance measuring feature. You can use such a multimeter as well for this method.
Follow the following steps:
- Take your capacitor
- First, do the visual inspection. If the given capacitor passes that test. Then try this method.
- Usually, a good looking capacitor can be a bad one. You can not filter such capacitors by visual inspection. That is why you should then go for this method.
- Discharge your given capacitor by shorting its legs through high resistance material.
- If you forget to discharge the capacitor, this may lead to a false reading and sometimes can damage your measuring device as well.
- After discharging, take the capacitance meter or multimeter and connect the probes.
- Connect the positive probe (red probe) of the multimeter to the positive leg of the electrolytic capacitor and the negative probe (black one) to the negative terminal of your capacitor.
- Note the reading on the screen of your device.
Now do the comparison of the noted value to the given value of the capacitor with tolerance.
The given value of a capacitor can be found on its body of it. It is usually written with block letters for easy reading.
The rule is, the noted value must be in the range of 10% to 20% of the given value of the capacitor.
For example, the multimeter gives you the capacitance value of let’s say 9.93F. The given value of the capacitor is 10+/-0.01% F.
Then according to the rule. The noted value must be within the 10% range of the given value, or else your capacitor is bad.
So, the above 9.93 is in the range of 10% of 10, i.e., the 9-11 range. This capacitor can be considered good.
If you get the noted value of let’s say 7F, then you would have a bad capacitor.
Method 3: Measuring the ESR value
The above both methods fail to work when you want to test a capacitor inside the circuit board.
Actually, you can use the visual inspection method to some extent. But the second method fails totally.
ESR stands for equivalent series resistance. What happens to a bad capacitor is that its ESR value changes. The change in ESR is totally helpful when determining with 100% sure if the capacitor is bad or good.
Usually, a bad capacitor can doge the visual inspection method as well the capacitance measurement method. But a bad cap can’t doge this powerful ESR method, especially when it is inside the circuit with a bunch of other components connected to it.
To perform this method you need to have a decent value ESR meter. There are many options available on the market. You can search for that.
The ESR meter that I will use for this method is called the MESR – 100 (Amazon link). You can take any meter of your choice, the steps of this method will be applicable to them as well.
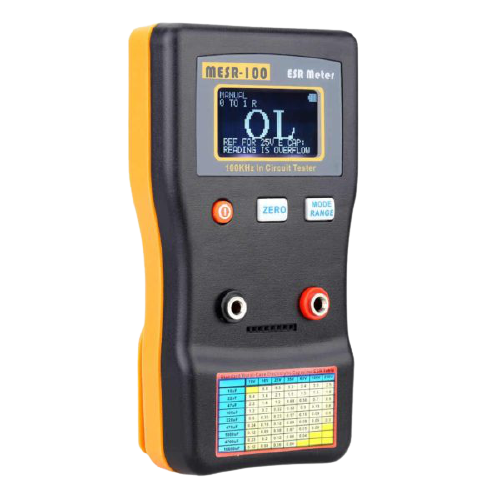
Follow the following step to check if the capacitor is bad or good.
- Take the MESR-100 and turn it on.
- Connect the probes
- Short the probes
- Press the zero button – so that you have no pre-stored value, and you start from zero
- Take your capacitor and discharge it properly through resistance material.
- Discharging a capacitor can be done by shorting the legs of the capacitor with any high resistance substance available to you.
- Connect the discharged capacitor to the ESR meter.
- MESR 100 is an auto range device. It will automatically set the suitable range.
- See the results on the display.
After you take the reading. Compare it to the given ESR table on the body of MESR-100.
If the results match, you have a good capacitor else your capacitor is a bad one
Method 4: Using a component tester
I believe you will like this method more than the above ones. Why? Because it is very simple.
A component tester is a device like a multimeter or capacitance meter. But it is geared toward testing and measurement both.
While a multimeter just does the measurement and leaves the capacitor testing to the person’s knowledge and experience.
A component tester solves this problem. And tell you directly if the component is bad or good. Leaving the guesswork.
Following is the m328 component tester.
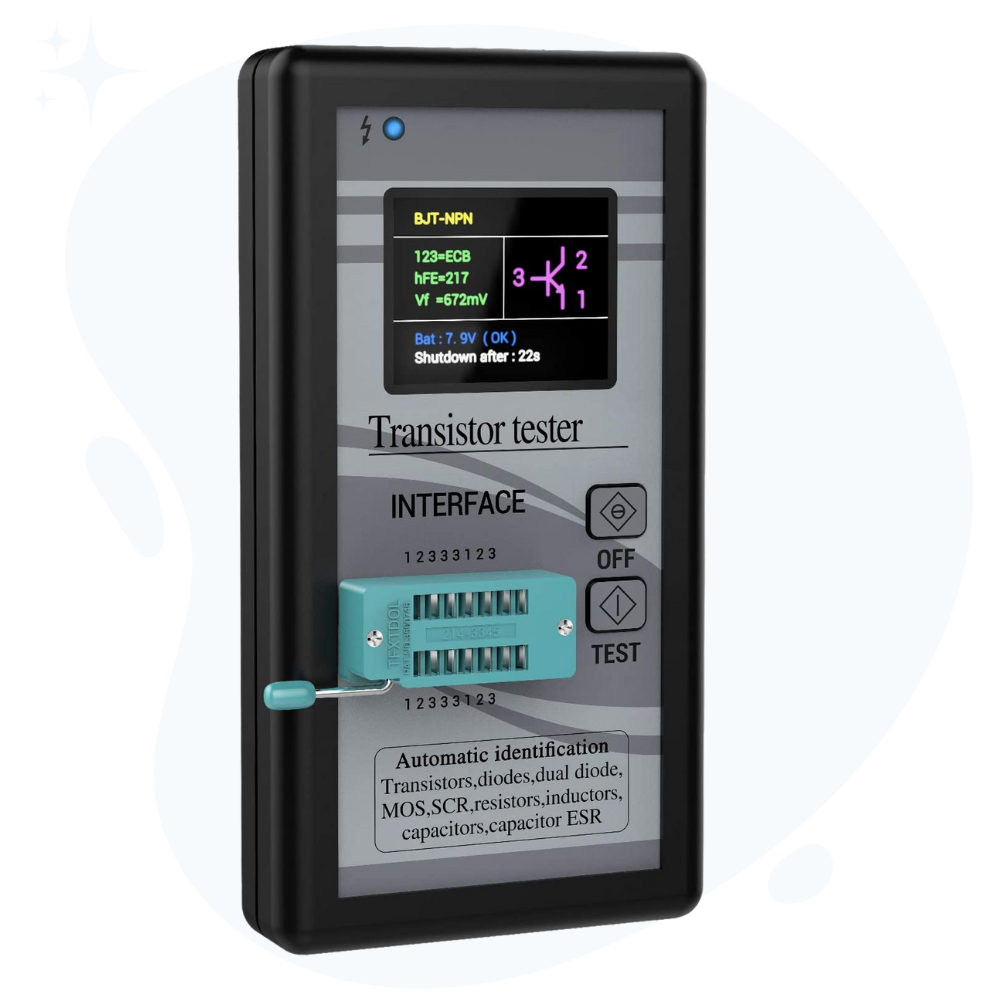
To use this mentioned tester for capacitor testing, follow the following steps.
- Take your capacitor and the m328 tester
- Turn on the tester and put the capacitor in the socket
- Remember to discharge the capacitor first, else it may damage the component tester
- Press test button
- See the capacitance and ESR value if the capacitor is fine
- Else the tester will show a message on the screen saying that the capacitor is bad
It is that simple.
Method 5: Using a voltmeter
I am mentioning this method because most of the multimeters don’t have capacitance-measuring features.
The ones that do have the capacitance feature are a little expensive.
So why not make the best of what we have?
For this method, we will be using the voltage measuring feature of any given digital multimeter.
- Take your capacitor and note down its maximum voltage ratings
- This rating can easily be seen on the body of your capacitor (for example 16V, 25, 250V, etc.)
- Now discharge the capacitor properly. And connect it to a power supply.
- Keep in mind never go beyond the maximum rating else you will damage your capacitor.
- For example, connect a 9V voltage if the capacitor’s maximum rating is 16V. I guess you got the idea.
- Charge the capacitor for a short period, say 4 – 5 seconds, and then disconnect the power supply.
- Set the Digital Multimeter to DC Voltmeter settings and measure the voltage across the capacitor. Connect the proper terminals of the voltmeter and capacitor.
- The initial voltage reading on the Multimeter should be close to the supplied voltage in a good capacitor. If the difference is large, then the capacitor is a faulty one.
Only the initial reading on the Multimeter must be taken into account as the value will slowly fall. This is normal.
This method should be only considered if you don’t have the budget to buy a decent digital multimeter with a capacitance measuring feature. Or in the case of urgency.
Why?
Because it involves connecting the capacitor to a power supply. If you have an adjustable power supply then it is okay. But if not then your measuring capability is limited because with a fixed power supply you can only measure a few capacitors.
Conclusion
Capacitors are two terminal passive components that we use for various roles in our circuits. Such as filtering, noise cancellation, and energy storage.
The issue with capacitors is that with time they degrade and need to be replaced.
Also, for the new project, we need to first verify if the capacitor is good or bad before placing or soldering it in the circuit boards.
So, to make sure we have good capacitors. We need to test and verify them.
In this article, I try my limited knowledge best to share three methods to tell if a capacitor is bad or good.
- The first method is a visual inspection in which we try to see some obvious signs on the body of the given capacitor.
- In the second method, we try to verify the written values of the capacitor by measuring it with a decent capacitance meter or multimeter.
- In the third method, we try to measure the capacitor ESR value and compare it with the given ESR table. This method is also helpful for in-circuit caps testing as well.
- In the last method, we use a component tester. We just plug our capacitor into the tester. The tester tells us the right way if the capacitor (no matter if it is electrolytic or ceramic) is good or bad.
Please understand how to properly discharge a capacitor. This is very important because capacitors can hold the charge even if the power supply is disconnected.
If the capacitor is not discharged properly and if you accidentally touch the leads of the capacitor, it will discharge through your body and cause an electric shock.
There are a couple of ways in which you can discharge a capacitor.
- Using a Screwdriver
- Using a Discharge Resistor (Bleeder Resistor)
That’s set. That is all I have for you guys about electronic capacitor testing. I hope you enjoyed it.
Thank you and have a grateful life.
Other useful posts: