

3 Easy ways to identify transistor legs/pins (2026)
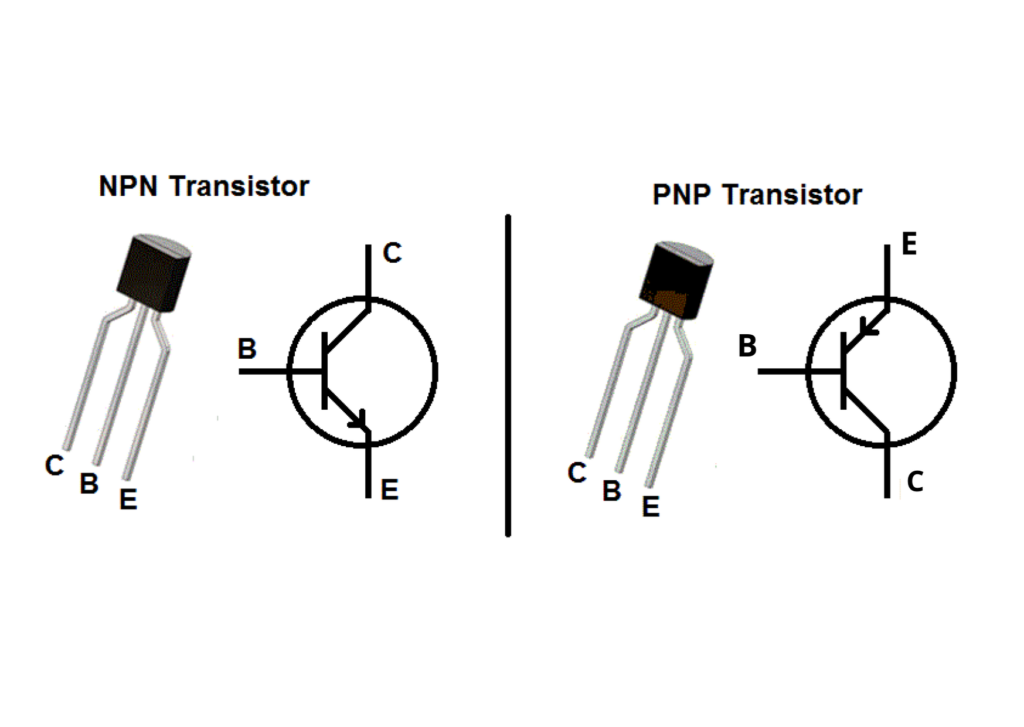
Identifying the transistor legs is crucial for connecting it in the right way so You should know which leg or terminal is the base (B), collector (C), and emitter (E).
There are three simple methods for identifying the transistor’s base, emitter, and collector pins. The first method will be based on the datasheet of the transistor. So you will need no device to go with this method. The second method is based on using a multimeter. The 3rd method is an advanced one, and it requires a special tool called the component tester.
In this article, we will look at the above 3 easy methods to help us identify transistor legs. I will explain each technique in detail to simplify the identification process.
Identify transistor legs
Transistor legs identification is very important. Because if you don’t connect a transistor correctly in the circuit. The circuit will not work. And there is a chance you may damage the transistor.
We don’t want to damage our transistors – they are expensive in some cases.
So let’s try to talk in detail about how we can identify transistor legs using the following easy methods.
Method 1: The dataSheet method
You know, I used this method in my student life a lot. I call this method a student broke method because I didn’t have enough money to buy a decent multimeter for my personal use. That was the story when I used to carry a billion dollars in my pocket – in cash.
Following are the step to implement this method:
- Take your transistor
- Google its number (you can find the transistor number on its body)
- Download the datasheet of the transistor
- In the datasheet go the physical structure portion.
- Place your transistor exactly as shown in the datasheet.
- Compare the legs (just put your transistor on your laptop screen in the exact way as shown in the datasheet)
- There you have it – it is that simple.
- Mark the legs as the base, collector, and emitter.
The key to success in this method is, please put your transistor exactly as shown in the datasheet. For example, in the datasheet diagram if the transistor is facing toward you, then you must position your transistor in the same way, i.e. facing toward you.
The other challenge you might face is, that sometimes it will be hard to find the datasheet. But trust me, you will definitely find it.
Sometimes, Google has disappointed me :D. So I used Bing, yahoo search engines. And found the datasheet there. There are a lot of very useful websites there to help you.
But in the end, this method is time-consuming and worth doing if you carry the same billion dollars as I used to – in cash.
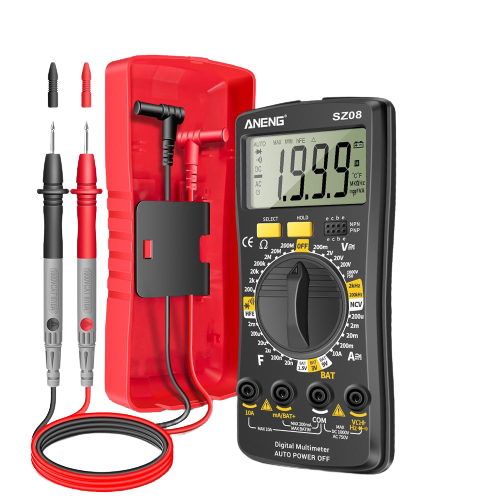
Method 2: Using a multimeter
This method requires a multimeter to perform. It also requires some technical understanding of transistors and a good quality multimeter.
Check out article on best multimeter.
Follow the following steps for this method
- Turn on your multimeter and set it to the diode test mode
- The red probe is positive (connect it to the V port) and the black probe is negative (connect it to the COM port).
- The middle pin of any transistor is the base (B) terminal
- Put the red terminal to the base pin, i.e. the middle leg
- Connect the black probe to the right pin, and note down the value on the multimeter screen.
- Connect the black probe to the left pin, and note down the value on the multimeter screen.
- The highest value in the above two is the emitter, while the lowest value is the collector terminal.
Use a paper to write down the numbers. Because in some cases, these values are very close to each other.
Method 3: Using M328 component tester
This last method is very interesting, and I can say that a lot of you may not have heard of this before. And the reason is, that this method is done through a special device called the component tester.
Now there are many options for component testers on the market. But the tester we will be using is called the M328 component tester (Amazon link). And the reasons are, that it is less expensive, reliable, and easy to use.
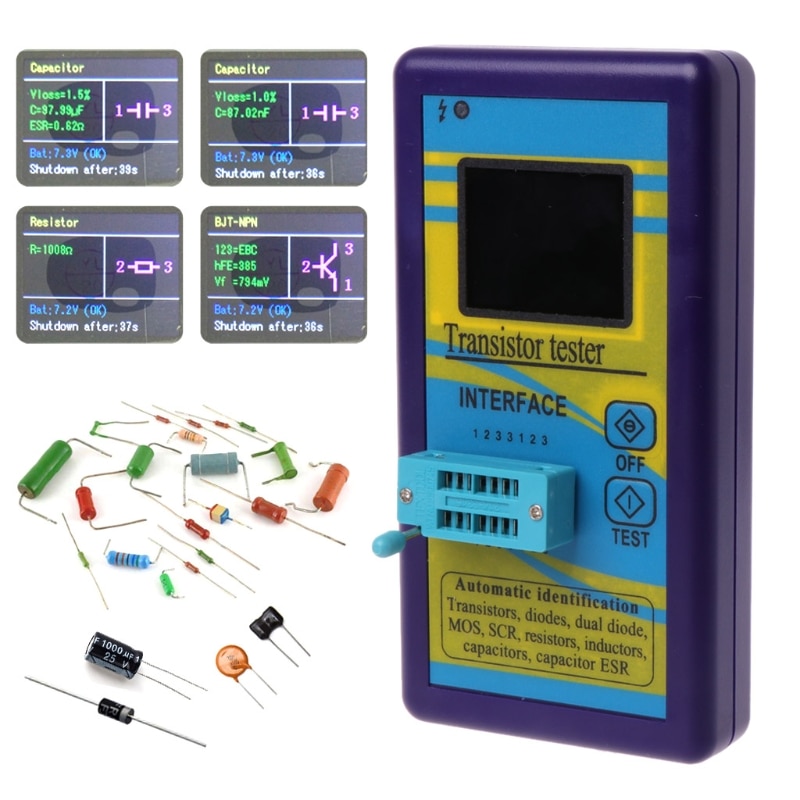
Let’s see how we can identify transistor legs through this device. Following are the easy steps.
- Turn on the m328 tester
- Put your transistor in the socket
- Don’t worry about anything, just put your transistor in any direction or polarity you like.
- Press the test button
- See the exact results (correct pin configuration) on the screen – it can’t be any simpler than this.
- On the screen, you will see which terminal is the base, collector, and emitter.
The important thing about this method is, that you can try it with any type of transistor. Furthermore, this m328 can be used for many other electronic components as well for terminal identification. Such SCR, LEDs, diodes, etc.
Other benefits of using this method:
- It tells you the type of transistor, i.e. whether it is NPN or PNP. Whether it is BJT or MOSFETs.
- It gives the forward voltage values and DC beta – which is so useful in circuit design and analysis.
- It also tells you if the transistor you are testing is a good one or a bad one.
I really enjoy this one.
In the end, you can clearly see all three methods. Now choose which you find easy and interesting. I will definitely say follow all the three for fun and learning.
Conclusion
A transistor is an active electronic component that we use for switching and application purposes.
Working with transistors requires some technical knowledge, like how to identify the legs of transistors. This is the first skill you need to master.
Because if you don’t care about leg or pin configuration – you may end up in a bad circuit or worst you can damage an expensive transistor.
We don’t want to damage our transistor in any case. So, to properly configure the pin configuration of any transistor. We can follow the three easy methods.
Method one is all about using the datasheet of that transistor and matching it to the physical structure given in the datasheet. This way, we are able to correctly find the exact pin configuration of the transistor.
The second method requires a digital multimeter. We perform this method using the diode test option on the multimeter and try to identify the correct pins of transistors.
The last method is very interesting. It requires a component tester. A component tester is a device we use to identify, verify, and test various electronics components.
With the component tester, you just put the transistor in it and press the test button. Within a few seconds, you get the right pin configuration of your transistor.
That’s set. This is all I have to share about how to identify transistor legs, i.e. the right pin configuration.
I hope you enjoyed it.
Thank you so much and have a grateful life.
Other useful posts:
one more question
it reads put the red terminal to base and connect black probe to right pin and than to left pin ,the same test goes for PNP and NPN ?
also how to check if NPN or PNP the transistor.
.
.
Your notes have been so helpful to me.Keep it up.
fantastic
Thank you 🙂