

For beginners in electronics or circuit repair, transistor testing (telling a good or bad transistor) is a big challenge.
Testing transistors is a fundamental skill for anyone working with electronic circuits. By looking at the transistor in a circuit you can also tell if the transistor is good or bad. Any sign of burn or broken lead indicates a bad transistor. The measuring tools like a multimeter and transistor tester are used to test the transistor before connecting it to confirm its functionality.
This article will help you to understand different parameters related to testing and various methods for testing a transistor.
Transistor testing general theory
Basically, a transistor is a three terminal active device that serves the following functions:
- Amplification
- Switching
Amplification has to do with transistor gain. In amplification, a weak signal is multiplied by the gain value of a transistor.
So, a bad or degraded transistor can have a gain less than its provided datasheet value.

And we can use this theory to actually test a transistor if it is a good one or the badly degraded one.
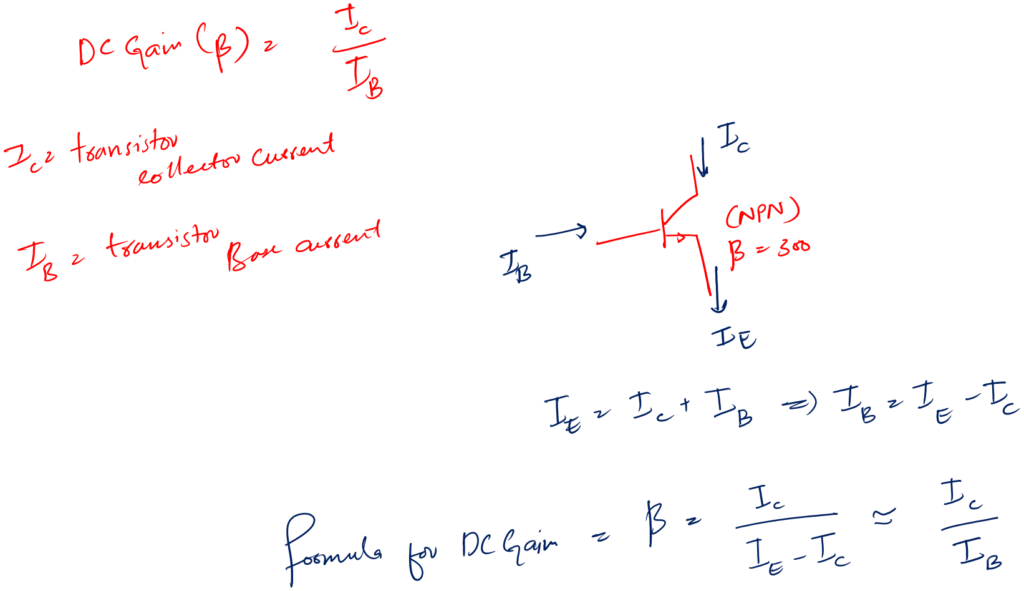
Measuring the DC gain
The question is how we can effectively measure the gain value. The answer is simply by measuring the ratio of the collector to the base current.
The following is the simple circuit setup for this process. You need a good digital multimeter for this experiment.
Please follow the procedure very carefully.
For measuring base current:
- Set the multimeter to microcurrent mode
- Make the above circuit on the breadboard and take the readings
For measuring collector current:
- Set the multimeter to Milli current mode
- Make the above circuit (to the right) on the breadboard and take the readings
After careful measurements put the value in the formula of transistor DC gain.
Compare the gain value with the value from the datasheet (search online by typing the transistor number). If they match you have a good working transistor.
Now, the question is, is there any easy way to get this beta value? Yes, there is. All you require is a digital multimeter with a transistor testing socket.
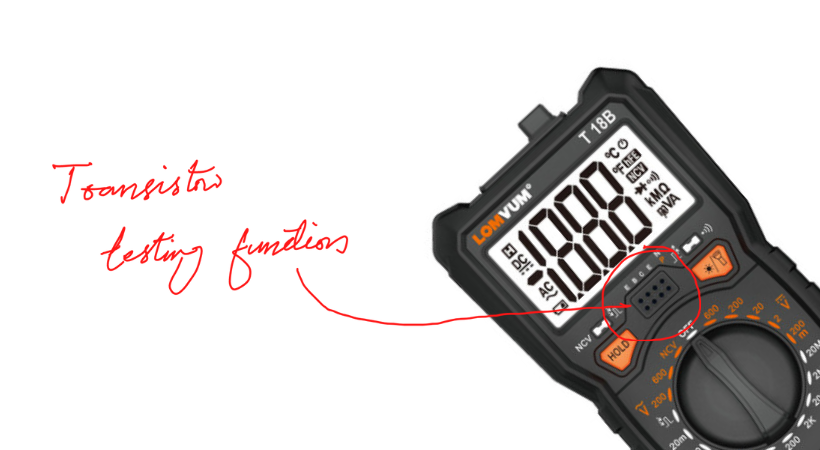
With that feature, all you do is put your transistor into the multimeter and get the beta results on the screen.
If you want to buy the best multimeter, check out our article:
Open and short legs (R-Method)
The next theory that we can use for transistor testing is to check if the terminals are in fine condition or not.
I mean if the terminals are open or short, then we can for sure say, the transistor is faulty.
I am calling this process the R-Method. Because in this method we will be measuring the resistance between the terminals.
Following are the possible combinations we can work on for NPN and PNP.

Among the above, the BC and BE terminals are important. Don’t worry about the CE connection.
We are not considering CE because if we get one of the three terminals bad then there is no use in wasting time on the rest.
But if we get two terminal rights then for sure we will of course test the CE connection.
NPN
This section is a little advanced. I am writing this article for beginners people. So if somehow you get confused. Don’t worry. Just take whatever you can and leave the rest.
I believe it is not that hard if you pay close attention. This theory will help you make your own devices and procedure to test transistors.
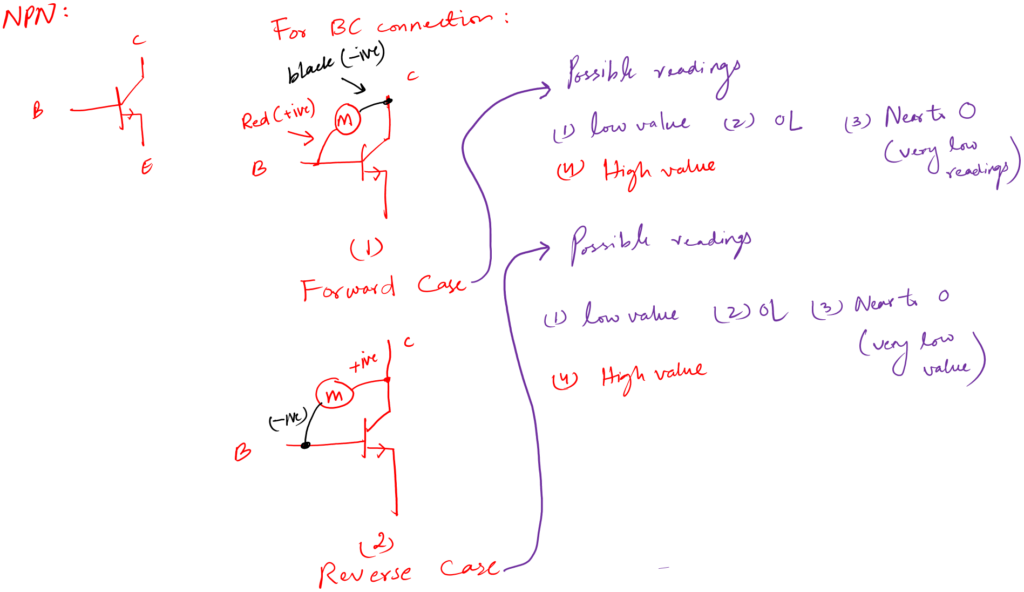
For BC connection testing:
- Take a multimeter and select the resistance feature.
- Forward case: connect the black (-) probe of the multimeter to the collector (C) of the transistor. And red probe (+) to the base (B)
- Take the readings
- Reverse case: Reverse the multimeter connections
- Take the readings
For a good transistor, you must get a low reading value in the forward case and a high value in the reverse case. Else you have a bad transistor.
For BE connection:
If the transistor passes the BC terminal testing. Next, we are required to check the BE connection for open and short.
In case a transistor somehow fails the BC testing. The transistor is bad and there is no need for further testing.
Go through the following steps. (they are similar to the above with little changes)
- Take a multimeter and select the resistance feature (in the range of 20K).
- Forward case: connect the black (-) probe of the multimeter to the emitter (E) of the transistor. And red probe (+) to the base (B)
- Take the readings
- Reverse case: Reverse the multimeter connections
- Take the readings
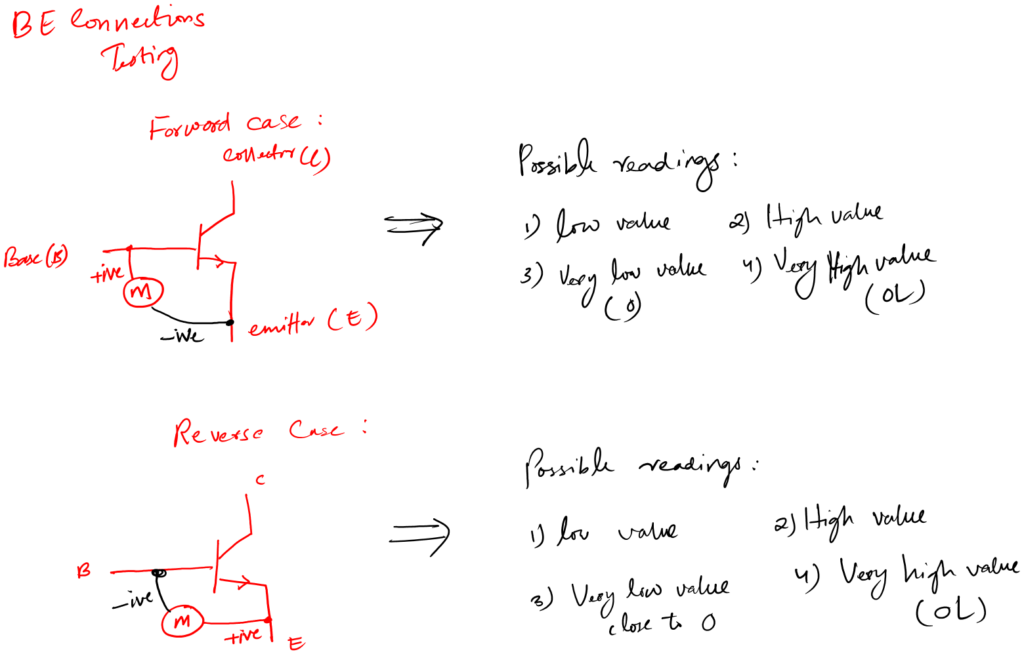
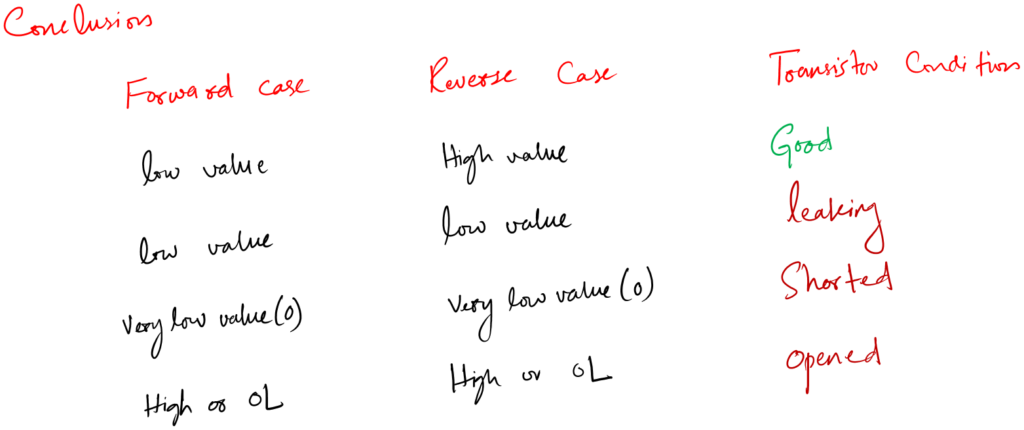
For a good transistor, the forward case should give you a low resistance value while the reverse should give you a high value. Else your transistor is bad.
For CE connection:
If the transistor passes the above two tests. Then for surety, we should also do this test.
In case the transistor failed one of the above tests, then there is no need for this one.
Follow the following easy steps:
- Take a multimeter and select the resistance feature
- Forward case: connect the black (-) probe of the multimeter to the emitter (E) of the transistor. And red probe (+) to the collector (C)
- Take the readings
- Reverse case: Reverse the multimeter connections
- Take the readings
A good transistor should give you high values in both cases.


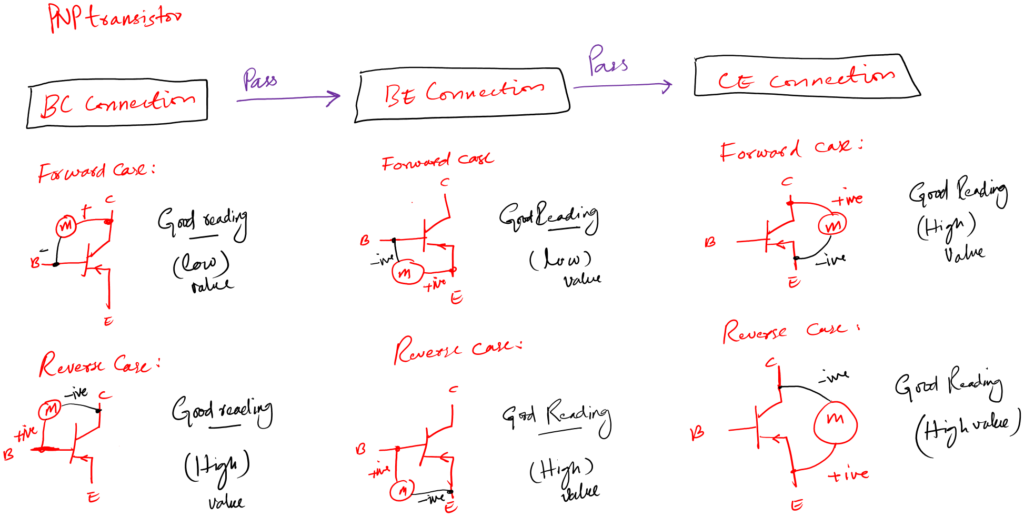
PNP
Reverse all the above connections and note down the reading.
Following is the summary of good transistor terminals in all possible cases.
Open and short legs (V-Method)
In case you don’t want to go with the resistance method (R-Method). The alternative to it is the voltage method (V-Method).
In this method, we use the multimeter diode function to measure the forward voltages across the BE, BC, and CE.
As diode function of the multimeter also beefs for short circuits. So if any of the mentioned connections are short, you will hear a beef sound.
Upon hearing the beef sound, it would be a clear indication of a bad shorted transistor.
The same connection will be used as discussed above. The difference would be.
For the forward case, you will see a voltage drop of 0.4-0.8V while for the reverse there will be no drop (OL). This would tell the good transistor.
Any other case will be a sign of a bad transistor.
Transistor testing methods
Let’s see how we can use some tools for transistor testing.
1. Visual inspection
As the name suggests this method involves judging a transistor by the naked eye.
Usually, a large amount of current flow is the reason for a damaged transistor. This damaged transistor is so easy to spot inside the circuit board.
The following are some obvious signs to look for:
- Busted open body
- Color-changed PCB around the terminals of a transistor
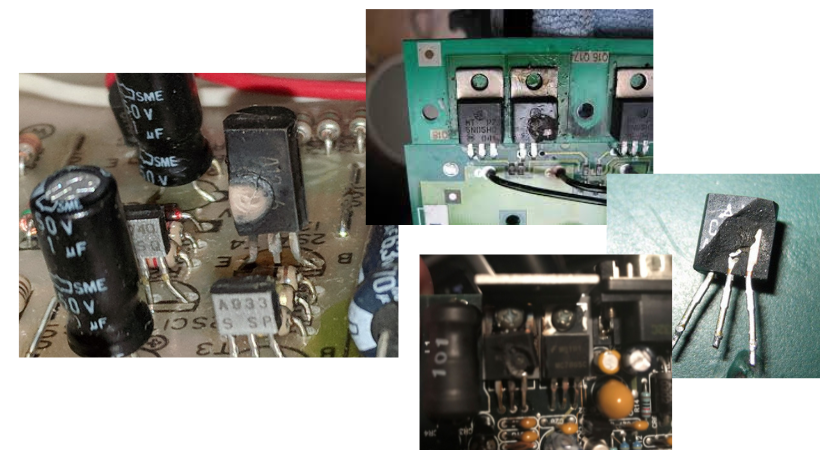
This method is best for inspecting in circuit transistors. If you see the above signs then immediately change that faulty transistor.
2. Using a multimeter
For this method, we would require a digital multimeter with diode testing functions.
We will follow the V-Method.
In circuit transistor testing
You have a suspected transistor on the board. Then follow the following steps.
- Set the multimeter to diode function (continuity function)
- On the circuit board, connect the probes of the multimeter in any combination with the transistor terminal.
- If you hear any deep sound, your transistor is shorted. Replace it.
- If you get in any arrangement the OL reading on the screen, your transistor is open. Replace it.
- Else we need further reading to ensure that it is a good transistor. Desolder it from the circuit board.
Off circuit testing
- Set the multimeter to the diode function
- NPN: Connect the multimeter red probe (+) to the base (B)
- Then first connect black probe (-) to the collector (C) and take reading
- Secondly, connect the black probe (-) to the emitter (E) and take the reading.
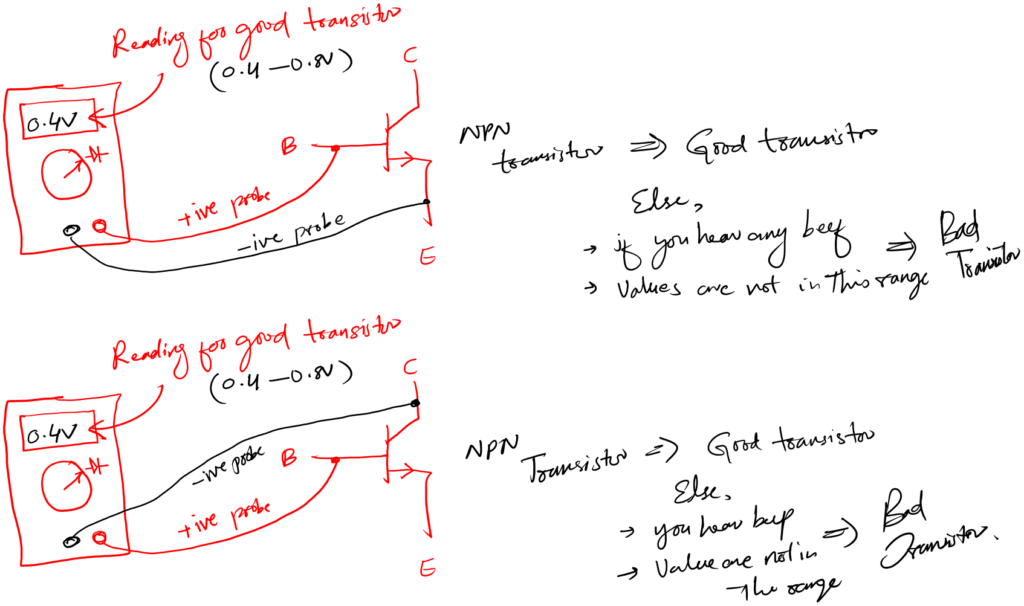
A good NPN transistor will give you a 0.4 -0.8V reading in both connections.
- PNP: Connect the multimeter black probe (-) to the base (B)
- Then first connect the red probe (+) to the collector (C) and take reading
- Secondly, connect the red probe (+) to the emitter (E) and take the reading.
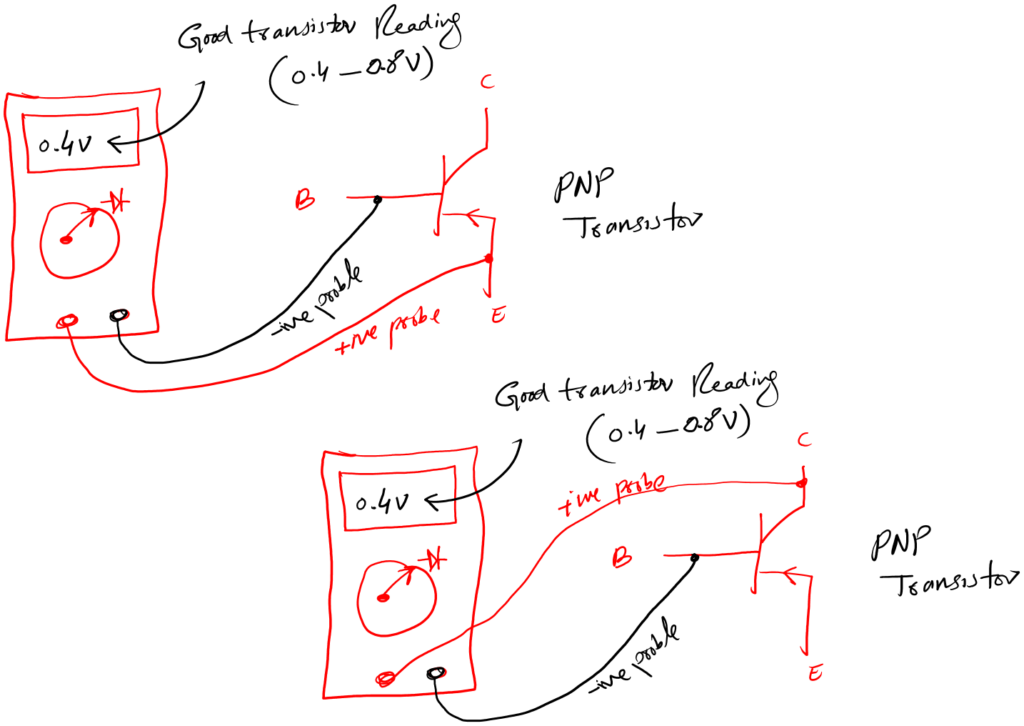
A good PNP transistor will give you a 0.4 -0.8V reading in both connections. Otherwise you have a bad PNP transistor.
3. Using a transistor tester
I am very likely to recommend this method to all new learners. Because it is very straightforward.
For this method, we would require a transistor tester like the m328 (Amazon link). You can use any other one, it doesn’t matter.
- Turn on your component tester
- Put your transistor in the socket
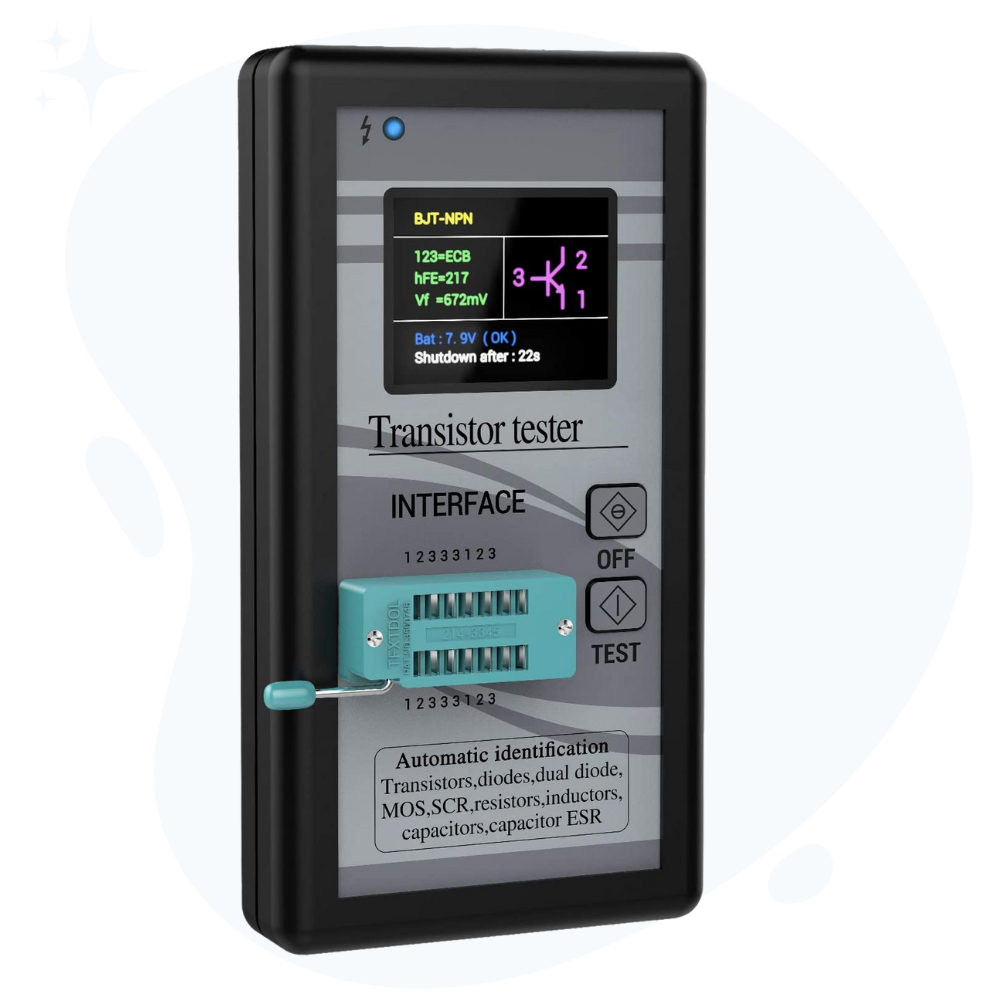
- Press test button
- The meter will give you the right pin configuration, the transistor type (NPN or PNP), circuit symbol, beta value, and forward voltage values – if the transistor is good.
- If the transistor is bad you will see a bad component message on the screen.
It just can’t be simpler than this.
Transistor testing importance
Let’s talk about a few reasons why testing transistors is important:
1. Functionality verification
To make sure the transistor is operating as planned, as a beginner you should test it.
Through this process, they may verify whether the transistor can amplify signals, switch currents, or carry out other specific tasks.
A transistor may not function as intended in a circuit if it is defective or damaged, which could result in unexpected behavior or circuit failure.
2. Detective transistor identification
In the manufacturing process, there is always a possibility of defective or counterfeit transistors entering the market.
The transistor connected to the circuit can also be defective or burned due to many reasons such as sudden increases in voltage and current.
Testing allows beginners to identify and weed out any such faulty components.
By verifying the characteristics and behavior of the transistor, you can ensure that you are using reliable components, which improves the overall performance and reliability of their circuits.
3. Learning and understanding
Testing transistors provides an opportunity for you to gain hands-on experience with electronic components.
By observing and analyzing the behavior of transistors during testing, you can deepen the understanding of transistor operation, characteristics, and specifications.
This knowledge is crucial for designing and troubleshooting circuits effectively.
Conclusion
Transistor testing means checking if the transistor is good, bad, or degraded.
We can use a few theories to verify a good transistor. We can verify its beta gain value by using a multimeter or any other available tool.
We verify this beta value by comparing it with the datasheet provided value. A bad or degraded transistor beta value doesn’t match with datasheet value.
Other than beta we look for short or open terminals.
Short or open terminals provide a sense of good transistors, but it is not enough to say for sure the transistor is all good for its optimal performance.
Therefore, we also look for leakage current to ensure the optimal operation of the given transistor.
Well guys, this is all that we cover in the above detailed article. I just share what I believe a beginner should know about transistor testing.
So that is it. I hope I was helpful.
Now it is your turn. Share in the comment section which method of transistor testing you like the most and why. Also, share this article with your friends, it will help me a lot.
Thank you and have a grateful life.
Other useful posts:
Very detailed an comprehansive
Is there any guide for digital transistor having 2 resistors in the base and base emiter? I would be happy to see this