

A resistor is the most fundamental electronics component that you encounter a lot in your life as a hobbyist or engineering student.
These tiny components are hidden everywhere in all the electronics devices that you see around you.
So, how to know what resistance each resistor is offering? The answer is straight forward, using a multimeter. But how multimeter measures resistance?
To know the answer I wrote this article. In this article, I share some basic knowledge about how you can measure the resistance using a multimeter if you are a complete beginner.
How multimeter measures the resistance
Resistance is the opposition of a resistor to the flow of current through it. The higher the resistance value the higher is the opposition and vise versa.
Now to measure the resistance we need a multimeter. And you know, multimeters are of two types, auto range, and manual range. Both do the same job but are a little different when it comes to time-saving and convenience.
For all the multimeters, you will observe the sign of “ohm” (Ω) somewhere on your multimeter. This is where the knob of your multimeter should point when you wish to measure resistance using a multimeter.
The Auto-range multimeters have only one setting or point where you will point the knob of your multimeter to measure resistance. I’m sharing the following image for your reference here.
If you have such multimeter, know that you are working with an auto-range multimeter.
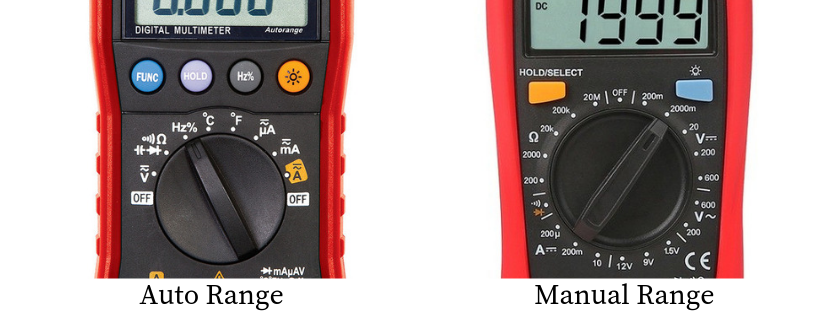
For the manual range multimeters, there is a single ohm sign and then there are multiple ranges defined under it. You can choose from all the given ranges according to your needs.
See the above for reference. If your multimeter’s settings panel looks like this, you are having a manual range multimeter.
Auto-range v/s Manual range
While we are already on the topic of Auto-range and manual range multimeter settings, why not discuss a little deeper to know, which one is better and why?
Since we are already living in the world of automation, we are addicted to it. We like automation more than anything. The same goes for multimeter settings.
The auto-Range multimeter will not bother you at all, you just put the probes across the resistor and it will give you value right away.
It seems pretty easy right??
On the other hand, while dealing with a manual range multimeter, you will have to keep rotating your knob to get to the right setting or range for your resistor.
This can be pretty tricky in the beginning as you yourself will experience sometimes if you are using one. Sometimes you are expecting a larger resistance value, but your multimeter gives a small value and you later figure out, you were working in a wrong setting all this time.
So, in short, auto range multimeter will save you lots of time and energy in your life.
Step by step guide on resistance measurements
Now that we already have had a detailed introduction about resistance measurement settings on a multimeter, let’s dive into our actual goal, measuring resistance using a multimeter.
To measure your resistor value using a multimeter, all you will need is your multimeter, and the resistor you wish to measure the resistance of. So, grab your materials, and let’s get started.
1. Connecting the probes
Connect the multimeter probes to the correct terminals. You might wonder at this point what the correct terminals are, right? Let me tell you in more detail. Look at the image below.

Most multimeters have three or four terminals and 2 probes. If you look closely, you will observe that each terminal is labeled.
The most common labels in multimeter are COM, VΩmA, and 10A. The COM terminal is the common terminal or ground. The VΩmA, as it indicates, is voltage, ohm, and milli-amps port. This means you can measure voltage, resistance, and small currents using this port.
So, for you, the correct terminals will be the COM and VΩmA terminals. Yes, you guessed it right. Connect the black probe in the COM port and the red probe to the VΩmA port.
2. Tunning your multimeter into OHM meter
Now that you have connected the probes, you need to turn your multimeter into ohm-meter, i.e a device that measures resistance. To do so turn the knob of your multimeter to Ω sign.
If you have an auto-range multimeter, you don’t have to worry much. But if you own a multi-range multimeter, you need to find a suitable range for the resistor you have chosen.
3. Open/Short circuit tests
These are the tests we conduct to ensure that the multimeter we work on is fine and are providing accurate results. For the open circuit, after tuning into Ohm meter we left the probes as it is i.e. open (not touching any device or itself as well). We check the display. If for such a situation multimeter is giving the reading of Ol or 1 it means our multimeter is in good shape.
For the short test, we short the probes and see the results on display. This test should give the reading of 0 on the display.
4. Measuring the resistance value
After the tests, we are good to go with resistance measurements.
Connect the probes of the multimeter to the legs of a resistor, one probe would be on one side while the other one is connected to the other side. It is important to note here that a resistor has no polarity, so it doesn’t matter which way you connect your probes to the resistor, the value of resistance will be the same.
Another important point here is for the people using a multi-range multimeter. You must start from the minimum range of resistance for your multimeter. If your resistance value is bigger than this range, you will observe ‘OL’ value written on the screen.
Switch to the next range and observe the value, if the same reading appears, increase the range of resistance again until you observe a numeric value on the screen. The OL value means “overload”, which means the multimeter is unable to measure the value of the resistor in the selected range.
Sometimes this may happen that you are operating your multimeter in larger ranges and your resistor value is too small to be detected in that range. In such cases, the multimeter gives a ‘0’ value.
This means for this range, the value of resistance is nearly zero, or immeasurable. For such cases, you need to step down the range and observe the values. In other cases, you might know a rough estimate of resistor value say 200 ohm and you measure the value and it comes out to be around 0.2 on the screen.
In such cases, double-check that you have your multimeter in the correct range because you will see that your multimeter was in the range of kilo-ohms and this is why your reading was too low.
5. Verification of measured resistance value
You can double-check this value by computing the value using the color bands of the resistor. If you know the color bands, you can do it yourself manually.
But if you still want a simpler solution, you can always consult google where you will find numerous color code calculators like this one (Click to visit). Just input the color of your bands and they will do the math for you.
Now you will encounter some situations where your resistance is not exactly what the color code is telling. Don’t worry. The resistance can vary a bit in some specified range depending on the tolerance value of the resistor.
It can be more or less than the actual value practically. All you have to worry about is, the value must be closer to the actual value, if not exactly the same.
Conclusion
Resistance is the opposition of a resistor to the flow of current. We measure this resistance in Ohm. There are several ways we can measure this resistance by using color coding, but a preferred way is to use a multimeter i.e. Ohmmeter.
In this article, I try to explain how multimeter measures resistance in an easy step by step guide. Let me summarize the tips for measuring the resistor value using a multimeter for you here.
- Make sure to connect the probes of multimeter correctly. Double-check for surety because you may damage your multimeter if you are not careful.
- While using a multi-range multimeter, always start from the lowest range and increase your range according to your need until you get a numeric value.
- Remember, a resistor is a non-polar device, so you don’t need to worry about which probe is to be connected to which side of the resistor. You can always confirm this statement by checking the resistance in both directions.
- Resistance can vary a little bit from its exact value. The measured value must be closer to the exact value.
Hopefully, it has helped you in some way.
**We learned how to measure resistor. Now let’s learn how to measure resistor when it is inside a breadboard circuit.