

A diode is a two terminal passive component that has the capability to allow the flow of current in only forward bias.
For beginners, sometimes diode reading is a big issue. They don’t know how to read its symbol, how to identify its right pin configuration, and so much more.
At the end of this article, you should be able to:
- How to read a diode properly.
- How to read bridge diodes, and Zenor diodes properly
- How to use a component tester to read a diode
Sounds interesting? Then let’s get started.
Diode reading for beginners
Before we get into diode reading. I believe it is effective to first know what a diode is.
This will help us give a general idea of how to test any given diode with any given number.
Alright!
Diode definition
Basically, a diode has two terminals. One terminal is positive and called the anode. The other terminal is negative and called the cathode. And it allows the flow of current in only one direction.
The flow of current happens only when the diode is forward bias.
By forward bias I mean when we connect the positive terminal of the diode to the positive terminal of a voltage source and the negative cathode to the negative of the voltage source.
When we reverse the said connections, we have reverse bias. In reverse bias, no current can flow through the diode.
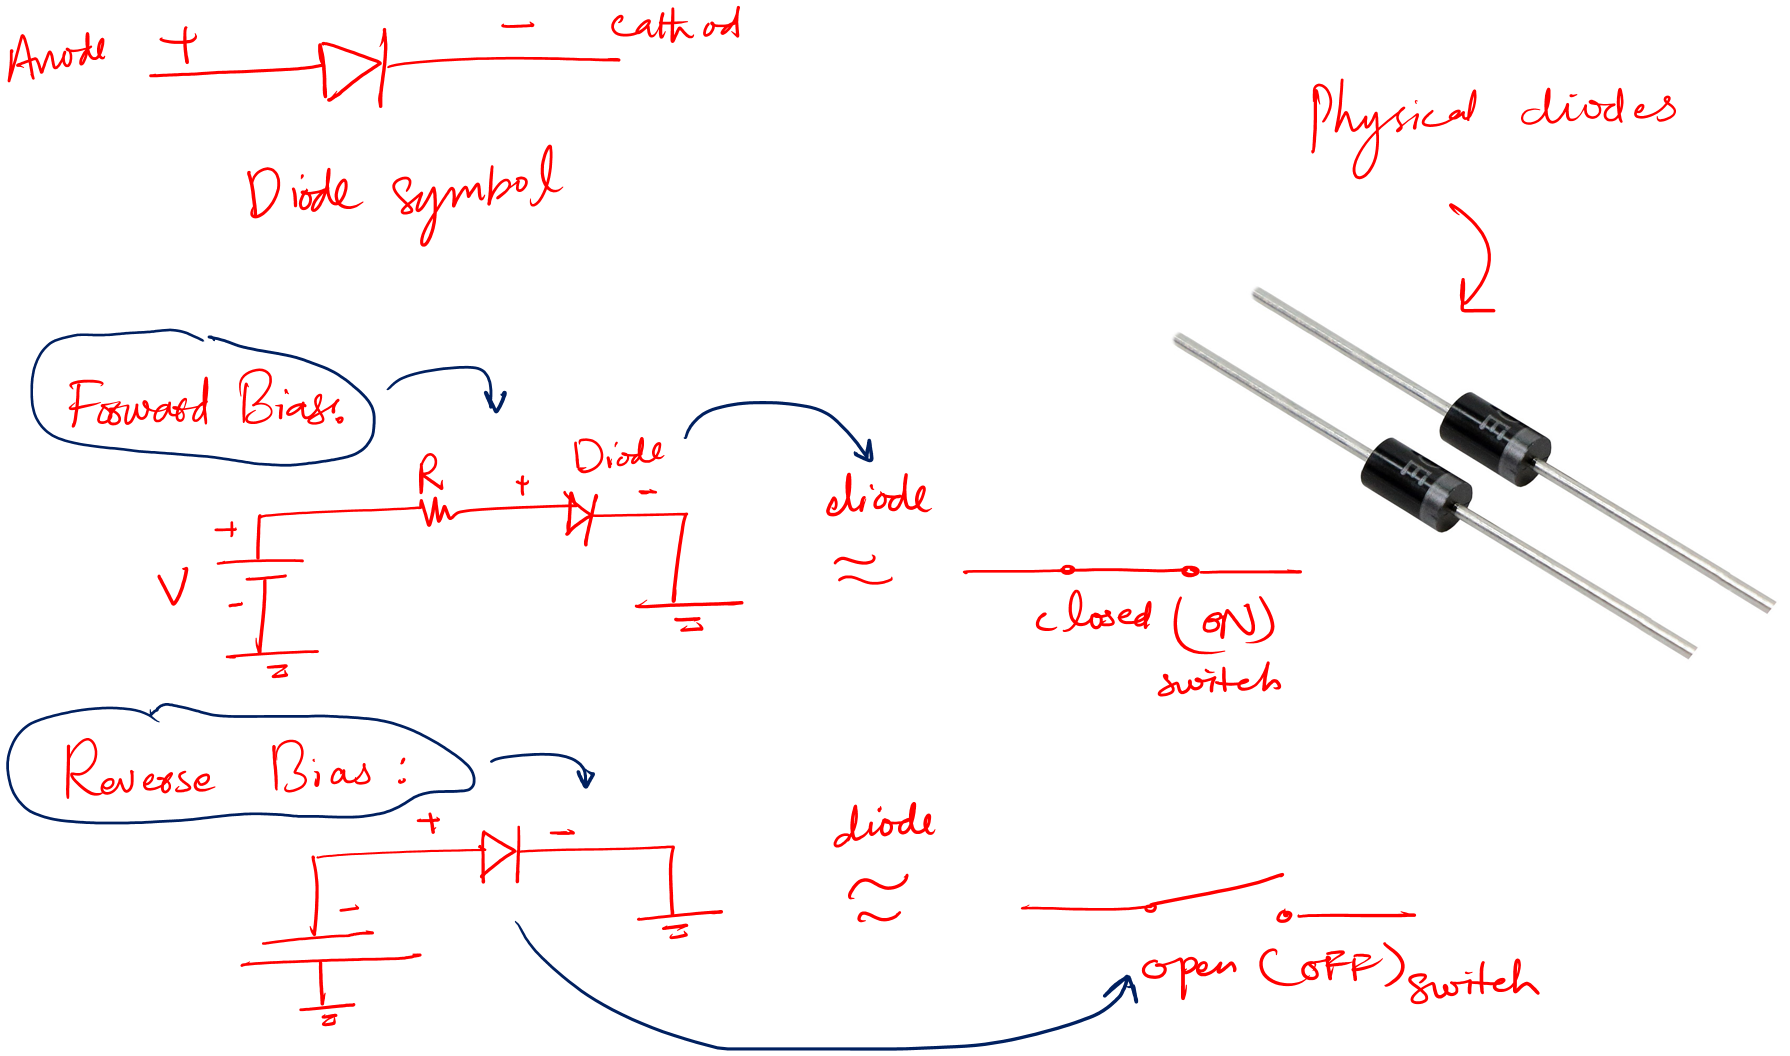
You know, as you can see in the above picture. A diode in forward bias acts as a closed switch.
While the same diode acts as an open switch when it is reverse bias.
Now, let’s see how to read a physically given diode.
Physical diode reading
By diode reading, we by default means to know which pin is an anode and which pin is a cathode before we put it in our circuits.
Following is the way to properly read a diode.
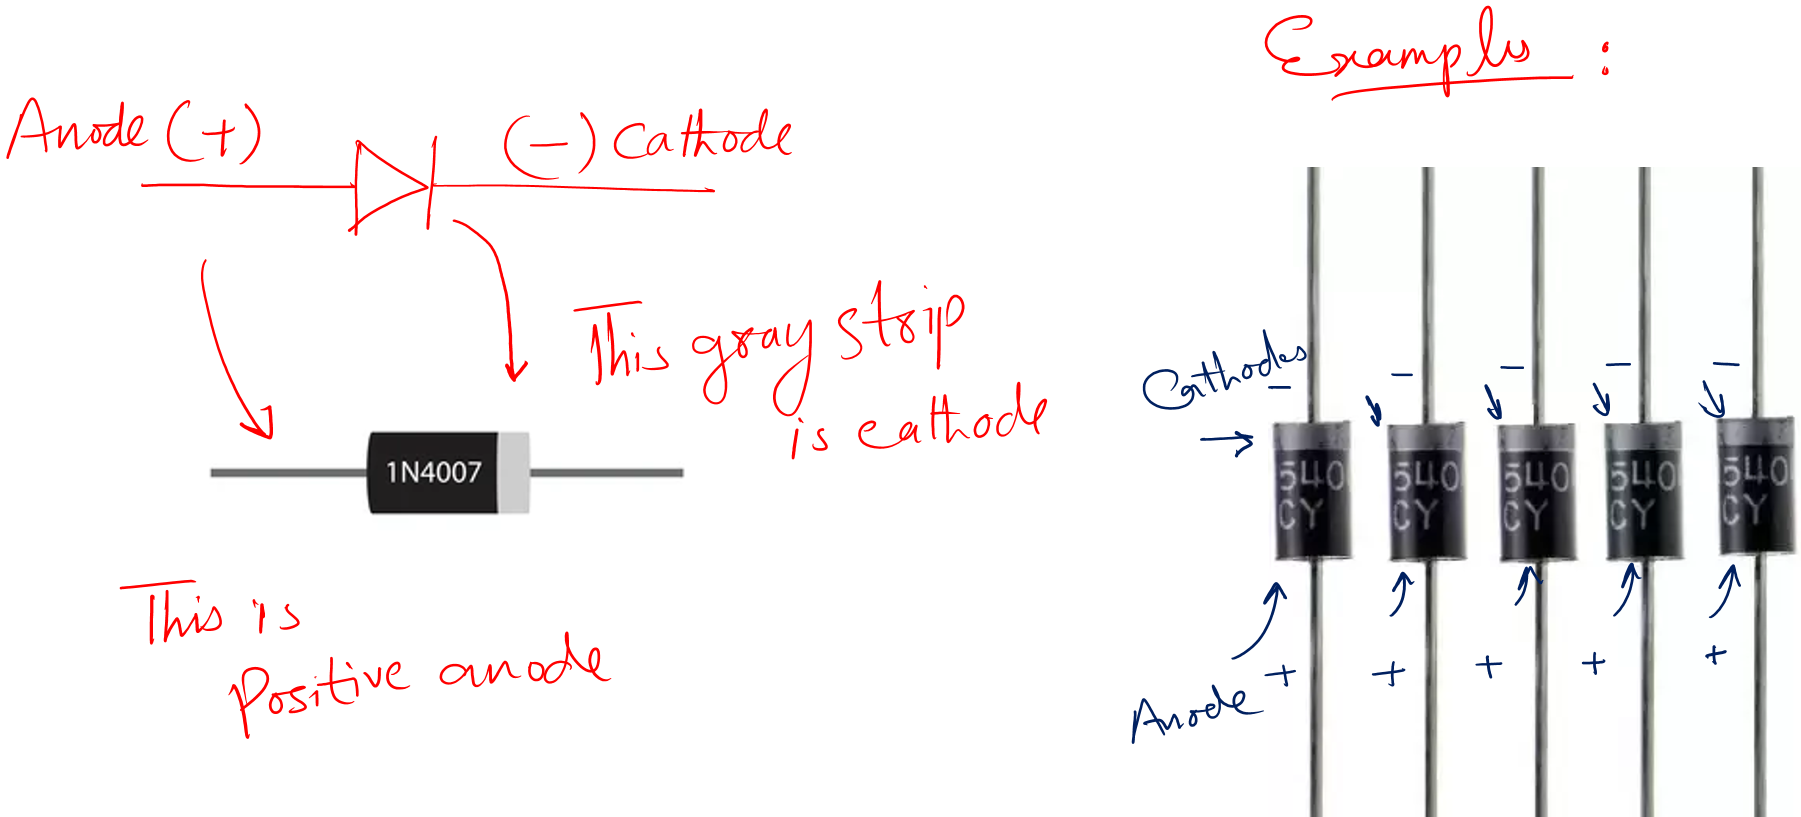
- Any physical diode has a gray strip or band on it.
- Look for that band.
- The band is the negative cathode terminal.
- And the other one is the positive anode terminal
It is that simple.
Alright!
Let’s talk about how to easily read a diode using a tester.
Diode reading with a diode tester
The above physical reading is limited to just finding out the right pins. Which is fine we need the right pins so that we can put a diode in a circuit correctly.
But…
It is not useful if the diode is old and the band has vanished with time.
It doesn’t help us to check if the diode is good or bad. What is the value of forward voltage for it and much more?
So to get all the mentioned we require a diode tester.
Alright!
This method requires a new tool called the diode or component tester. This component tester is an amazing and fun tool to have in our labs. It makes our lives easy and most importantly, it shows we have a deep love for electronic devices.
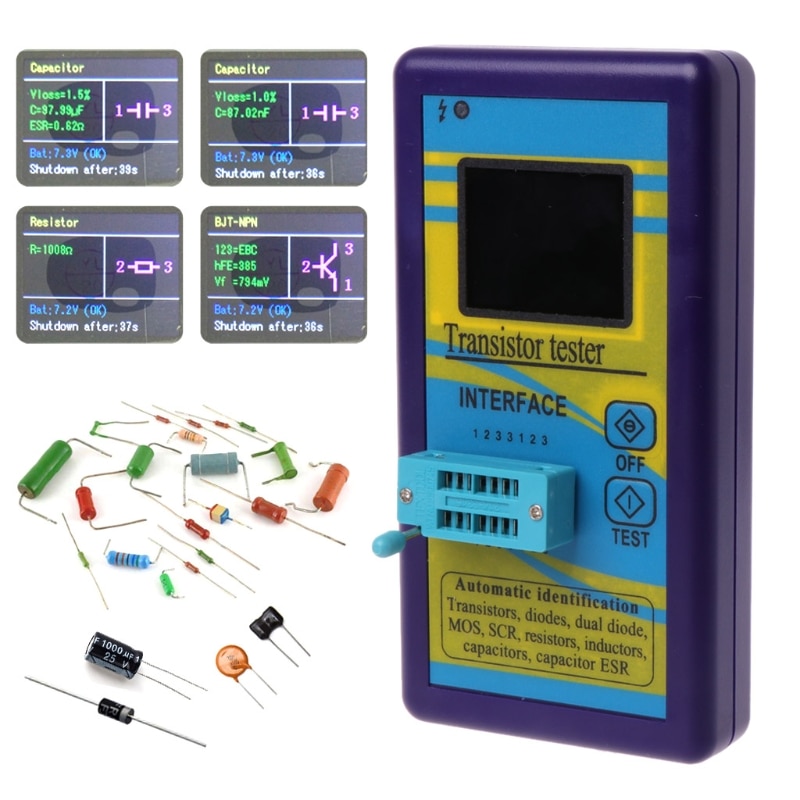
Following are the steps to use this tool for diode testing:
- Turn on the tester
- Place the diode you want to test
- Press test button
- See the results on the screen.
- It will give you the right pin configuration on the screen
- Also, it will help you.
- If the diode is fine you will see a forward voltage drop of 0.7V for Si and 0.3V for Ge.
- If the diode is bad you will see no results – it is that easy.
As this method seems interesting. And you should try this definitely. But this method has a fundamental limitation. You can’t use it for in-circuit testing.
Now, if the component tester mentioned above has got you curious and wants to know more about it. Here is the link, M328 Component Tester (Amazon link), for your own further research and investigation.
Bridge diode reading
A bridge diode or simply rectifier is the proper combination of pin diodes that help us design power sources.
The rectifier converts the main AC into the required DC.
Now the challenge of reading a rectifier is that it has both AC and DC terminals. AC terminals are those where the AC input comes in. The DC terminals are those where the converted DC goes out.
And solving this challenge is actually the bridge diode reading.
Following is the easy way to read a bridge rectifier:
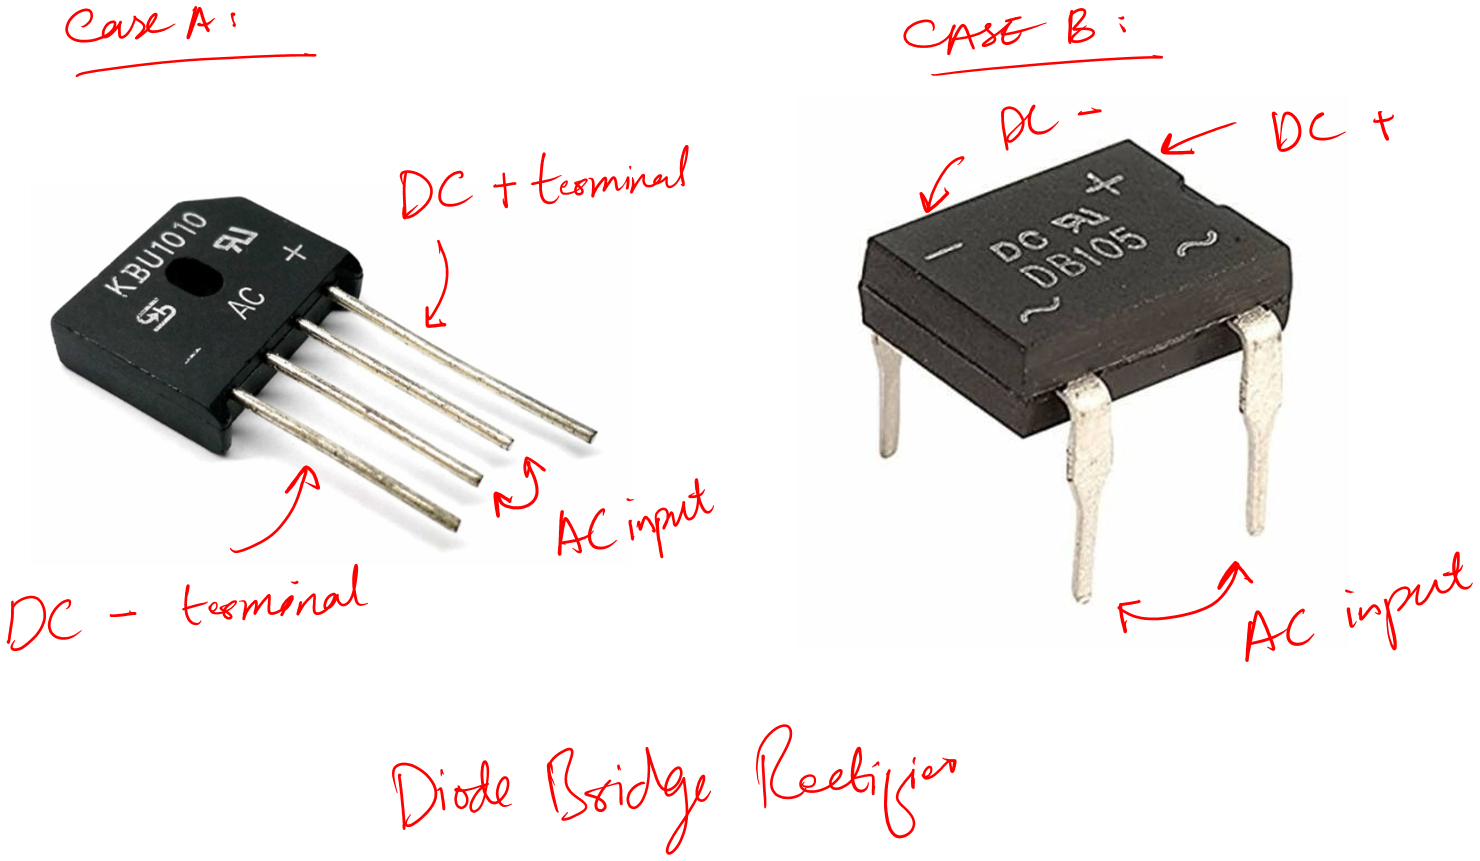
- Find the AC sign
- These AC signs are polarity independent. Just attach the AC input the way you like.
- Look for the + sign – this is your DC positive output
- Look for the – sign – this is your DC ground or the general negative terminal
Now the bridge rectifier can come in any package. It may be square or plate. It doesn’t matter. The above steps are applicable to every package.
Zenor diode reading
Zenor diode is the type of diode that we use mainly for voltage regulation. By regulation, I mean to have a constant voltage level irrespective of the load.
The reading of the Zenor diode is similar to that of the pin diode.
- Take your Zenor diode
- Look for a black or gray band on the body of the given Zenor diode
- The marked side is the negative cathode terminal
- The other one is the anode terminal
Now if you are dealing with an old Zenor diode or its mark has vanished. Then you should use the above component tester for testing such a diode.
Following are the steps to use a component tester for reading a Zenor diode.
- Turn on the tester
- Place the Zenor diode you want to test
- Press test button
- See the results on the screen.
- It will give you the right pin configuration on the screen
- Also, it will help you.
- If the Zenor diode is fine you will see some values related to Zenor diode
- If the Zenor diode is bad you will see no results – it is that easy.
Now the given Zenor diode can be of any rating. The component tester will exactly give its right pin configuration in no time.
Conclusion
You know a diode is one of the fundamental circuit components. You will find it in almost every electronic circuit.
It has two terminals called the anode (+) and cathode (-).
But when it comes to diode reading (right pin configuration and identifying a bad diode) a beginner finds it very challenging.
So, in this article, we look at how a beginner can easily read any given diode.
The short summary of diode testing would be like this.
- Every diode has a gray band on its body
- Locate that band
- This is your negative cathode terminal
- The other one is the positive anode
Now, if the diode is old or has no bands then you need a decent component tester to read that diode for you.
Alright!
This is it. That is all I want to share with you about diode testing for beginners. I hope I was helpful, and that you enjoyed this article.
Now it is your turn. Tell me what part you enjoyed the most. Also, please share it with your friends. It helps me a lot.
The following are helpful resources to learn more about diodes.
- Diode Testing (Know if a diode is bad, open, or short)
- Diode Anode Cathode Identification (#2 Easy Methods)
- 13 Diode Functions in Circuit (Key Roles of Diode)
- Bad Diode Symptoms (How to know if a diode is bad)
- Identify terminals of unmarked diodes (Easy Solution)
- How To Test Diode Without Multimeter (Easy Solutions)
- Learn Diode Basics for complete beginners (Easy guide)
- Design of Half Wave Rectifier Circuit [Single Phase]
Thank you and have a grateful life.