

Hay there! looking for the answer of how to test diode without multimeter? Then, you are at the right place.
In this short article, I will try to explain some methods that you can use to test a diode without a multimeter. And tell whether the diode under test is the bad or good one.
I hope you will enjoy this article and will find the answers you are looking for.
How To Test Diode Without Multimeter?
To answer this question, let gets something clear right away. If you are working with diodes. This means you are into electronics person. And when you are electronics enthusiastic and do not have a multimeter, it is next to impossible.
But anyway, I am assuming you do have a multimeter (if not, it is totally ok) and just out of curiosity you are looking for an answer. And curiosity is what science and engineering are all about.
So, let’s begin our journey and start finding creative answers together.
In short summary, to test a diode without a multimeter you need to make a simple continuity circuit or a decent component (diode) tester. A continuity circuit can be a very basic circuit with a power source and indicating load. A component tester is a device that is specifically designed to tell what is wrong with a component (diode) under test i.e. open or shorted.
A bad diode can be sometimes spotted by just looking at it on the printed circuit board (PCB). There will be some black smoke around the bad diode that you would be able to see.
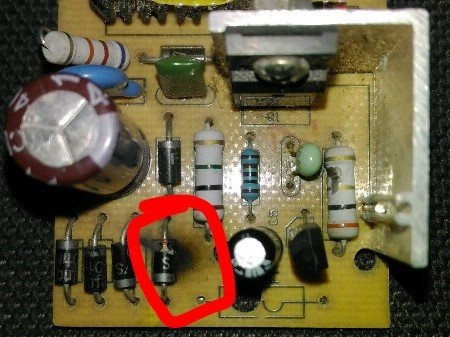
You know, diodes are most of the time used at the front end, near to the main power supply. And that is the reason due to overvoltages they get damaged and need to be replaced.
You can identify a bad diode by just looking at it, sometimes you will see black smoke, and sometimes it is broken just a rod into two separate pieces.
Alright!
In the above situation, you don’t need any multimeter to test a diode. It is just that straightforward.
Now consider you have a diode, and you are not sure whether it is bad or good. And luckily you don’t have any multimeter around you. So what you can do, how to test a diode without a multimeter.
Let’s see the solutions (some of you may say finally this guy come to the main topic 😄)
Using a continuity circuit to test diode without a multimeter
The first solution is easy and free. All you need to do is use some basic electronics concepts and design a continuity circuit. I am using the following circuit. But you are free to use any creative idea to measure circuit continuity.
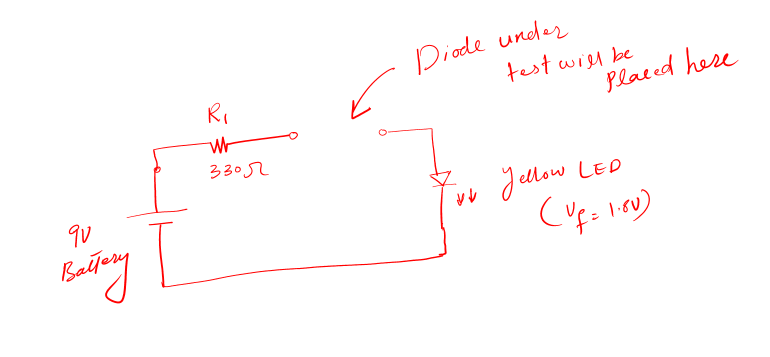
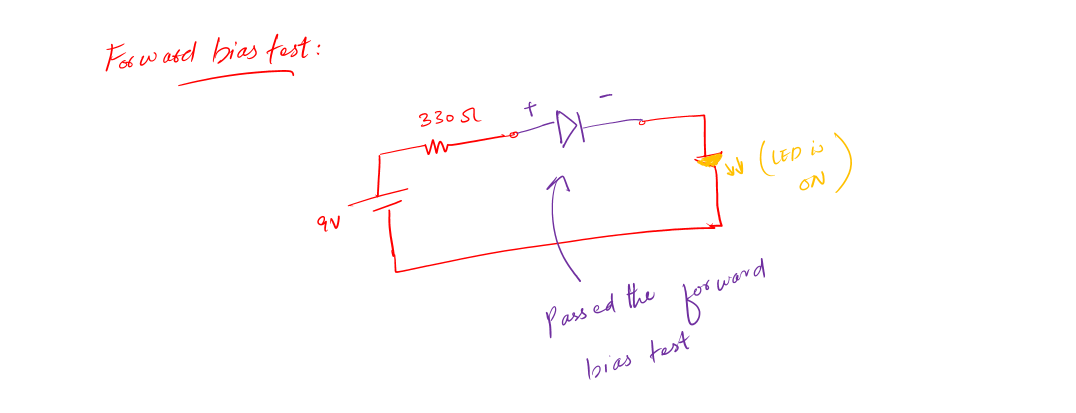
Now we know that if I place a diode in the testing area (the open terminals in the above circuit). A forward bias diode will make the circuit complete and the yellow led will glow. This would mean that the diode has passed the first test i.e. forward bias test.
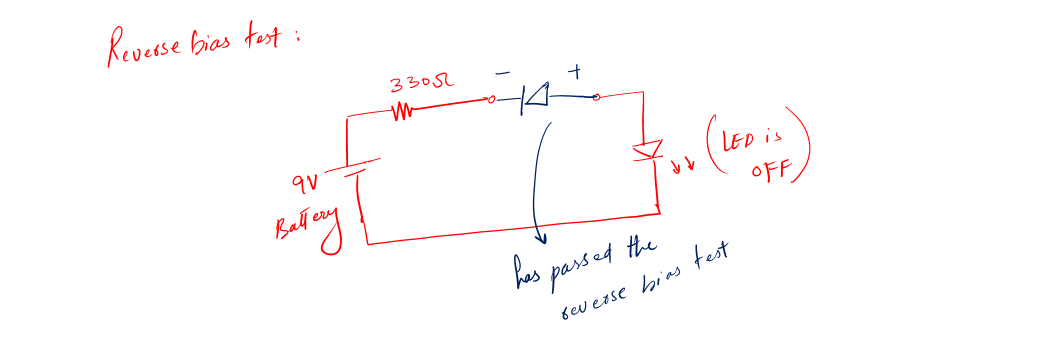
For the second test (reverse bias test), we will place the diode in reverse bias mode and will see the circuit. If the led doesn’t glow it would mean the diode under test has passed the second test as well. And now it is safe to mark this diode as a good one.
Note: for a diode to be good, it has to pass both tests.
Now the above is the reference circuit that can be used for low-power diodes. But if you are testing high power diodes then you need to calculate the value of the battery, resistor, and led accordingly.
Using a component tester to test diode without a multimeter
The second solution is very simple, unique, and is very interesting. There is a device called a component (diode) tester. Some people also call it a transistor tester as well.
The point is, this device can literally tell you what component you have placed in it and can tell you all the respected parameters of that component automatically just by pressing a single “Test Button”.
Let’s take a look at it and then we will learn how to use it to test a diode.
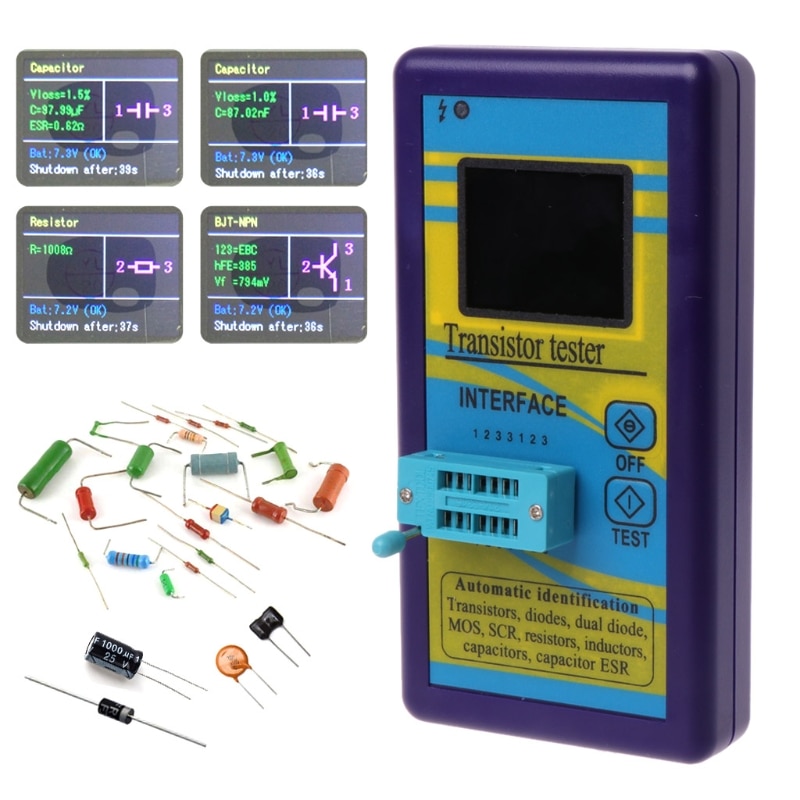
To use a component tester for testing a diode follow the following easy steps:
- Turn on the component tester
- Place diode in the socket area of the tester
- Press the test button
- If the diode is ok, you will see on the screen it Vf (forward voltage)
- If Vf is around about 0.7 for Si diode, then you a good diode else a bad one. It is that simple. For Ge, the Vf should be 0.3V
If you like this amazing tool you can find it here M328 Tester (Amazon link). I really recommend this to have some fun with electronics and explore new learning opportunities.
Summary
To find the answer of how to test diode without multimeter. First, we need to understand why it is important to test a diode in the first place. We test diode because a bad diode would lead to bad circuit functioning, which in the end would lead to a bad product.
We test a diode to tell whether it is ok or is it open or short. Open and short are the two main cases when it comes to testing a diode. Open diode means you have ideally infinite resistance across its terminal while short means you have ideally zero resistance between the anode and cathode terminals.
We use a multimeter to check a diode for open and short cases. But here in this article, we are interested to know how we test a diode without using a multimeter.
There are the following two possible solutions:
- Using a continuity circuit
- Using a component tester
Using a continuity circuit is a simple method and anyone with basic electronics can do it without any help. Just make a simple LED circuit (with a 9V battery, a 330Ohm resistor, LED, and connecting wires). Open the connecting wires anywhere you like and place a diode in the forward bias mode i.e. connecting the anode to the positive terminal and cathode with the ground terminal. If in the forward bias mode the LED of the circuit glows it means the diode is fine and ready for the nest test.
The next test is to put the diode in reverse bias mode and see if the LED glows. If the LED remains OFF, it means your diode is fine. With passing both forward and reverse tests you can confidently say that the diode under test is completely ready to be installed in the circuit.
Moving toward the next method, using a component tester. This method is very interesting and straightforward. Place your diode in the component tester (an amazing electronics that we use to identify and very various electronics components) and see the results. A good diode will have a forward voltage of almost 0.7V. If you see this reading on the screen, this means your diode is good else it is a bad one.
I hope you have learned something from this article and enjoyed it.
The following are helpful resources to learn more about diodes.
- Easy diode reading for beginners (Pin, Bridge, Zenor)
- Diode Testing (Know if a diode is bad, open, or short)
- Diode Anode Cathode Identification
Thank you and have a grateful life.